Showing posts with label Scrum. Show all posts

Tuesday, November 11, 2025

Agile on the Fly! Mastering Real-Time Sprint Operations with MS Project Agile (2)


In the first part of this article (read here), we understood the following:

  • Our Current Sprint State
  • Performing Activate/Inactivate Operation
  • Performing Delete Operation
  • Performing Add Operation

In this part, we will check certain additional operations, which are crucial as you manage your Sprint hands-on. There are many other operations, which you - the Scrum Master or Product Owner - have to perform in your Scrum project. Detailed, hands-on videos are part of the Mastering MS Project Agile course. See here.

We will start with the modify operation

Performing Modify Operation

As you proceed with your Sprint, you are also likely to perform several edit or modify operations, such as duration, resources, start date, and end date, among others. This can be done by simply double-clicking on the Card (work item) in the Current Sprint Planning Board view and changing the necessary fields. 

As shown for the featured item of Create a new user, I first double-clicked on the corresponding card, and then I can change the resources in the popped-up Task Information dialog box. You can change multiple fields with this option. 

You can also select the card, right-click and choose the Information option from the drop-down list to see the Task Information dialog box. 

Performing Move Operation

Not every work item included in the Current Sprint will be completed. It’s highly possible that some of the items are not started or are partially complete. In such a case, the items are to be moved into the next Sprint. This is one of the rules in the Scrum framework (see here). Note that the incomplete feature items don’t count toward velocity (see here). 

To move a work item into the next Sprint, again you can use the Current Sprint Board view. Select the work item (Card) and use the Move to Next Sprint command from the list. 

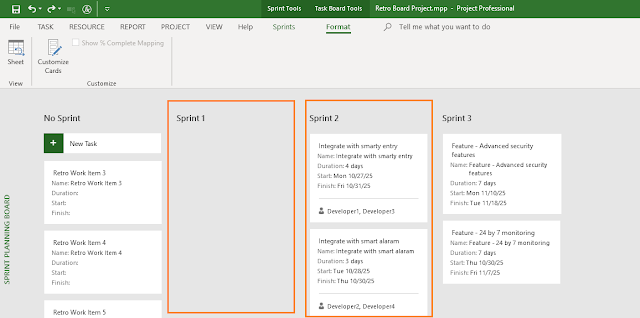
When you use this command, the item will be moved into the immediate next Sprint, not any other! To be sure, you can verify it in the Sprint Planning Sheet view, which is for all the Sprints in the project. Keep in mind that once a work item is complete, it won’t be visible in the Current Sprint Board or Current Sprint Sheet view. This is because of the Sprint Planning Filter (see here).  

As shown in the above figure, the feature Edit an existing user is now part of Sprint 2. Earlier, it was part of Sprint 1.

As it’s moved into the next immediate Sprint, the board status is maintained as Next up. The % Complete value for this work item will also be preserved. Your team can work on this item in the next Sprint. 

Performing % Complete Change Operation

While the % Complete mapping is done for the various workflow states in the Board, it’s not written on stone. For example, in our case the % Complete Mapping is %, 10%, 50%, and 100% for Sprint Backlog, Next up, In progress and Done, respectively. 

It’s possible that you may want to change this % Complete for a particular work item. This can be done by opening the Task Information dialog box and changing the % Complete value in the General tab. This is shown below. 

As shown, for the work item, I’ve changed the % Complete to 20%, in place of the default 10%. You can cross-check this % complete update in the Current Sprint Sheet view.  

While you changed the % Complete value to 20%, notice that the Board Status is not changed, and it still remains in the Next up workflow state.

Demonstration and Key Points

Now, let’s demonstrate what we have learned so far, along with some key points to remember while adjusting a Sprint in progress. I’ve prepared the below video [duration: 5m: 29s] for this purpose. For the best experience, you may want to go full screen in HD mode and plug in your earphones.


Conclusion

In some of the cases, it’s possible that while performing these operations, resources may be overallocated. You can quickly solve overallocation using the Team Planner view available with MS Project Online Desktop client, which has the Agile features.

Projects, like human beings, are living entities. Just as every human being changes, so does a project. If the environment is high-churn, then humans must rapidly adapt and adopt, and so does a Sprint project.

This article outlines certain key operations to adjust a Sprint project. I hope it gives you the understanding to perform various operations within a Sprint, the confidence to conduct any operation in a Scrum project, and brings value to your work.

--

This article was first published by MPUG on March 14, 2023. This an updated version. 


Sunday, November 09, 2025

Agile on the Fly! Mastering Real-Time Sprint Operations with MS Project Agile (1)


A Sprint is a mini-project within a larger Scrum project, and it's usually timeboxed for two to four weeks. Though timeboxed, a number of things can change within these weeks. In fact, adjustment of a Sprint in progress is the norm, not the exception. 

In an environment with rapid changes (see here) in requirements and technological uncertainties, a number of areas such as scope, resources, risk, and even business priorities may change. Agile/Scrum, after all, is all about change. In fact, one of the principles in the Agile manifesto states: Welcome changing requirements, even late in development. Agile processes harness change for the customer’s competitive advantage.

Note: The content of this article has been taken from Mastering MS Project Agile course. See here. It's world's only hands-on, in-depth course to master MS Project Agile.

For a project executed in Agile mode, one can have the following:

  • Addition, removal, or modification of work items within a Sprint, i.e., changes to the Sprint Backlog.
  • Refinement of Release Plan (see here for release planning), i.e., change in features for the Sprints within a Release.
  • Refinement of the (Product) Backlog (see here), i.e., addition, removal, movement, or replacement of backlog items, which can be features or stories.
  • Rolling-wave planning (see here) for upcoming Sprints, as the current Sprint draws to a closure, among others.

In this article, we will specifically learn how to adjust a Sprint which is in progress. We will see the following real-time Sprint operations:

  • Activate/Inactive Operation
  • Delete Operation
  • Add Operation
  • Modify Operation
  • Move Operation
  • % Complete Change Operation

If you’re working hands-on with MS Project to manage your Scrum project, these operations are vital to know. So, let's start with our Current Sprint State.

Current Sprint State – Timeline View

The current situation for our Sprint is shown in the Timeline view of MS Project Agile. Our Sprint is of two weeks duration from September 11, 2023 to September 24, 2023.

As shown in the above figure:

  • There are 3 items to be delivered: Login to the online trading system, Create a new user, and Edit an existing user, which are 50%, 50%, and 10% complete, respectively.
  • The Sprint event of Sprint 1 Planning is 100% complete, along with four Daily Scrums. These are indicated with a tick mark for the events.
  • Our status date is September 18, 2023, which is one week after the Sprint begins on September 11, 2023.

As we proceed, we will perform several operations. These are important to know if you are really working in a Project with multiple Sprints. As any real-world Agile practitioner would tell you, all these operations may happen.  

However, before you proceed, there are important instructions you need to know before starting, which are mentioned in the below video [duration: 2m:38s].


Next, let's us see our current Sprint board to understand the status date and various workflow items available in respective workflow states.

Current Sprint State – Current Sprint Board 

The current situation for our Sprint is shown in the Current Sprint Board view. 


As shown, several items are either complete (shown with a tick mark on the Cards) or progressed as on the status date, i.e., one week into the Sprint. 

The % Complete of features and Scrum events for the entire Sprint can be seen in the below Current Sprint Sheet view. You have to add this column.

As shown above:

  • The features Login to the online trading system and Create a new user are 50% complete, whereas the feature Edit an existing user is 10% complete. 
  • A number of Daily Scrums are complete.
  • The Sprint Planning event is also complete.

Now, we will proceed with various operations.

Performing Activate/Inactivate Operation

When you try to inactivate a task in any column state, except in the Sprint Backlog state, MS Project software won’t allow it to function! The reason is simple – you can’t inactivate a work item, which is activated and in progress.  

A work item (or task) can be inactivated by going to the Task tab, then Schedule group, and using the Inactivate command. It’s highlighted in the below figure. 

Now you may be wondering how to inactive such a work item. You have to take it back to the Sprint Backlog state to inactivate. This can be done either in the Current Sprint Planning Board or the Current Sprint Planning Sheet view. 

As you can see, the work item is inactivated because of the column state (Sprint Backlog), and the % completion. 

Performing Delete Operation

While you can’t inactivate an in-progress task, you are allowed to delete it. You can do so by selecting the work item in the column (workflow) state, right-clicking and using the Delete Task command. This is shown below. 

But then the MS Project software will pop up a soft message for you, unlike the hard message shown for inactivation we saw earlier.   


As shown for the selected feature item of Edit an existing user, when the delete command is pressed, a message pops up. This message wants you to confirm that you really want to delete it. 

If you proceed, the work item will be fully removed from all the views. In other words, the backend database completely removes the work item. Hence, be careful! 

Performing Add Operation

This is another operation that MS Project Agile practitioners use. While scope addition during the Sprint is not encouraged, it’s very likely to happen in the real world. Even though you may not want your scope to expand, new tasks related to a feature might come up anyway, and those must be added. 

You can add a new task by going to the Current Sprint Sheet view, right-clicking, and using the Insert Task command. Notice that as you add a new work item, the default Board Status used will be Sprint Backlog. 

You can also add the new work items using the Gantt Chart view or the using the New Task command of the Current Sprint Board view. After you add a new work item and associate the resources (see here) to it, it can be properly visualized in the Current Sprint Board view with the needed fields. This is depicted below.


This article continues into part 2. See here.

In the next part, we have additional operations for a Sprint in progress. 

Friday, September 27, 2024

ManagementYogi’s Hybrid-Agile (CHAMP) Certification: Retrospective Boards in Hybrid-Scrum Projects (2)


In the first part of this article, we saw the following:

  • A Retro Board and Out Current Scenario
  • Creation of the “isRetro” custom field
  • Creation of Retro Board Filter
  • Creation of the Retro Board 

In this post, we will visualize the retrospective work items in the boards, associate them with the Sprints as well as manage the retrospective work items. 

Towards the end, we have certain key points to note followed with concluding remarks.

[Part - 1]

Visualizing the Items in the Board

From your current view, switch to the Retro Board. This can be done by going to View tab > Task Views group and then selecting the Retro Board from the custom section. 

This will result in the display of the newly created Retro Board view.


As shown in the above Retro Board view, all the retro items are part of the Backlog column.

  • There are other columns such as TODO, DOING and DONE. 
  • I’ve customized the existing columns by renaming them.
  • % Complete values are also customized. 

Do note that there is no Sheet view related to Retro Board view because we have not created one. As you proceed and use the board, we won’t be needing a sheet view. Hence, this corresponding view need not be created. 

Associate Improvement Items with Sprints

Next, we are going to associate the work items with the upcoming Sprint. This will happen during the Sprint Planning Meeting for Sprint 2. Do note that at this stage, Sprint 1 complete with all its work items. The Sprint Planning Board view at this stage will look as follows.

As you can see in the above figure, all Sprint 1 are completed. Next, as you take the retrospective items for Sprint 2 and associate them with Sprint 2, you will have the following view in the Gantt Chart.  


So, let’s see these items in the Retro Board view, too. But before that, one more twist! We have to customize the Cards to know the Sprints or which Sprint they belong to. This can be done by going to Task Board Tools > Format tab > View group > Format command. It’ll launch the Customize Task Board Cards dialog box as shown below. 

As shown, Sprint is now added as one of the fields, so that we clearly know which items are taken for in which Sprint. 

With the above customization, the Retro Board will now come as shown as below.  

Customizing the cards provides you with a better visualization as you manage and track the items. 


As shown above, now the cards are customized for each retro work item, and they show:

  • ID, Names, Durations, Start and Finish dates.
  • It also shows the Sprint names.

Manage Retro Work Items 

To manage, you have to simply drag and drop the work items, move them across the workflow states as it happens for other works items in the Hybrid-Scrum project. When a work item reaches the DONE state, then you’ll find a tick mark towards the top right corner of the card. This is shown below.

If you have come this far, then you can quickly create a Retro Board, populate the work items, associate them with the Sprints and track them to completion. 

This can be seen as well in the Hybrid-Scrum project with all the elements, which is shown below.


As you can see in the above figure, for our Hybrid-Scrum project, Sprint 1 is complete and Sprint 2 is currently under execution. For Sprint 2, you are not only completing the feature related work items, but also completing retrospective items. 

Key Points to Note

As we reach the end of this article, here certain key points to note about Retro Board and associated items:

  • It can be used in Lean-Agile (Scrum or Kanban), or Hybrid-Agile projects. Hence, don’t have to create a separate project. The created retro board is integrated in.
  • Retrospective items are also part of your (Product) Backlog. This we saw in the earlier parts of this article. 
  • Your team should take a few items, at most 2 for the next iteration or Sprint. When taken they will be part of the Sprint Backlog. Ensure that they are tracked and completed.
  • The retrospective items can be seen in the Current Sprint Board view because they are associated with respective Sprints.
  • The retro items can be considered as part of the Burndown Charts and Burnup Charts.  

Demonstration
A demonstration for the Retro Board is shown in the below video [duration: 04m:14s]. 


Conclusion

As the saying goes, simple things are always easy to remember compared to complex things. I believe this is the simplest way to track the retro items in a separate board. 

It also a good idea to track the items in a separate board because the retrospective items are usually neglected by Lean-Agile teams as feature completion fever takes over considering the small iteration duration. However, as I noted in the beginning, retrospective is the most important ceremony among all and to honor it, you need to take and execute the retro work items. 

[Part - 1]

--

This article was first published by MPUG.com on 5th March, 2024. This is a refined version.


Sunday, September 22, 2024

ManagementYogi’s Hybrid-Agile (CHAMP) Certification: Retrospective Boards in Hybrid-Scrum Projects (1)


Retrospective is an important event in Agile. In fact, I’d say the most important one. This is a meeting where the team finds out what they could have done better and what the improvement items are. Not only that, they will also have an execution plan to take up the improvement items.

At this point, it’s important to note that retrospectives and lessons learned meetings are not same! Retrospective also differs from intraspectives. While lessons learning meetings are conducted to identify and share the lessons learned in a project, phase or iteration to improve, retrospectives, on the other hand, are recurring events in Lean-Agile to explore the work done and improve based on the results. For for Scrum, it is at the end of the Sprint, whereas for Kanban, it’s can be based on cadence. Nevertheless, one can say retrospective is a form of lessons learned meetings.

[Part - 2]

A Retrospective Board

The quickest way to take the retrospective items and implement them is by using the Retrospective Boards. The simplest ones are with the following columns in the board:

  • Stop doing, Start doing, Keep doing (or simply StoStaKee)
  • Stop, Start, Stay (or SSS, Triple S)
  • Same as, More of, Less of (or SAMOLO)

The above concepts are taken from ACP Live Lessons - Guranteed Pass. Let’s take the first one of StoStaKee. A sample board can be shown as below. 

For this article, our focus is on the items which we want to do or execute the improvement items, which are in the “Start Doing” column. 

These items will be taken into our Hybrid-Agile plan, put into the Retrospective Board and be executed. I’d strongly recommend that you check this article of Hybrid-Scrum management, before going deeper into this article.  

Current Scenario: Our Hybrid-Scrum Project

We will take the plan from our earlier Hybrid-Scrum project, where we have multiple Sprints planned along with the predictive/waterfall elements. One of the Sprints is complete and at the end of the Sprint quite a few retrospective items were decided to be taken-up. This is shown in the below figure. 


As shown in the multi-Sprints Scrum Development phase, we have completed Sprint 1. In the next Sprint’s (Sprint 2) planning meeting, the retrospective items that can be executed will be taken-up and planned for.   

Next, let’s proceed with our creation of the Retrospective Board with MS Project Agile software tool. The board will have the retro work items. We will have the following steps.

Create isRetro Custom Field

As shown, first you have to create the isRetro custom field. It’s a Boolean Field.


You don’t have to change the:

  • Custom attributes
  • Calculation for assignment rows
  • Values to display

Just keep it simple, though further customization can be done.

Create a Retro Board Filter

Next, we will use the Retro Board Filter, a new custom filter. This can be created by going to View tab > Data group > Filter option > More Filter dialog box. In the opened-up box click on the “New…” command to create a new filter. 

As shown below, the new filter created is Retro Board filter

The above filter has the following parameters:

  • Show on Board is “Yes” or enabled.
  • Summary (Tasks) is “No” or disabled.
  • %Work Complete is 100%, i.e., incomplete work items will be shown.
  • Active is “Yes”, i.e., only Active tasks will be shown.
  • isRetro custom field is enabled for this filter. We have created this custom field before.

Create the Retro Board

Next, we will create the Retro Board, which will internally have the Retro Board filter that we just created. 

To create such a board, go to View tab > Task Views group > Task Board drop down > More Views… command. This will open-up the More Views dialog box, where you can create a new Retro Board using the “New…” command. 

As shown below, we have the Retro Board view available with the Retro Board Filter applied. Don’t forget to apply this filter.  

Ensure to enable the “Show in menu” option, which helps in showing the Board when you quickly need it.

Add the Retrospective Items

As and when retrospectives happen in your Hybrid-Scrum project, you can add the improvement work items into the task items and hence the board. For this purpose, I’ll have another summary task and put all my retrospective items under that summary task.

Now, you may be wondering why not keep these items as parts of the Sprint? You can! But it’s not very effective. Also, you really don’t know which items will be taken in which Sprint. Do you? Rather, the items will be prioritized and then taken. 

As shown below I’ve a summary task Retrospective Items, under which I’ve a number of retrospective work items.  

Also, as you can see in the above figure:

  • No Sprint has been associated with the Retro work items.
  • The Show on Board field has been enabled.
  • The duration is not decided for the work items.

We can’t decide on the work items’ duration as that will happen during the upcoming Sprint’s planning meeting. Also, it’s a good idea and practice not to take more than 3 items for the upcoming Sprint. As I’ve seen, effectively, a Scrum Team can complete at most one or two items for an upcoming short Sprint of 2-week duration. 

Next, we are going to visualize these work items in the newly created Retro Board.

The concluding part of this article is available here.

[Part - 2]


References

[1] Online Course: ACP Live Lessons – Guaranteed Pass or Your Full Money Backby Satya Narayan Dash

[2] Certification Course: Certified Hybrid-Agile Master Professional (CHAMP), by Satya Narayan Dash

[3] Scrum and Microsoft Project: Agile Project Management Training, by MPUG.com

[4] Online Course: Mastering MS Project Agile, by Satya Narayan Dash


Wednesday, September 11, 2024

Understanding the CIPSA Scrum Framework – Practical, Hands-on Scrum at Scale


Two Lean-Agile approaches are popular and widely used at the Team Level – Scrum and Kanban. The CIPSA framework recognizes this and hence, uses both of them. You can choose the approach you want for your organization and can scale using the CIPSA framework. 

MS Project Agile is a widely used project-portfolio management software tool with extensive Agile capabilities. It also supports both Scrum and Kanban such as Sprints, Boards related to Sprints as well as Boards and Views related to Kanban.

In this post, we will learn more on CIPSA Scrum Framework.

The CIPSA Scrum Framework

The CIPSA Scrum framework extends the team level Scrum and will have the following artifacts, events and roles (accountabilities).

CIPSA Scrum Artifacts: There are three artifacts:

  • Product Backlog, 
  • CIPSA Sprint Backlog, and
  • CIPSA Integrated Increment.

All individual Scrum teams use a single Product Backlog. The Backlog items are distributed across the teams. 

A CIPSA Sprint Backlog is built during the CIPSA Sprint Planning event and it's the sum of all work done by individual Scrum teams for the upcoming Sprint.

The third artifact is the CIPSA Integrated Increment, which is the sum of all integrated work from all Scrum teams and is given at the end of (or during) the Sprint. 

CIPSA Scrum Meta-Events: There are Six (Meta) Events in CIPSA Scrum framework: 

  • Cross-Team Backlog Refinement,
  • The Sprint, 
  • CIPSA Sprint Planning,
  • CIPSA Daily Scrum, 
  • CIPSA Sprint Review, and 
  • CIPSA Sprint Retrospective. 

CIPSA Scrum Roles: There are two distinct roles in CIPSA Scrum Framework complementing the accountabilities at the individual team level. They are 

  • Chief Product Owner (CPO), and
  • Principal Scrum Master (PSM). 

At the individual Scrum team level, there will be Product Owner and Scrum Master and Developers. 

The CIPSA Scrum Framework – Graphical

The CIPSA Scrum framework is shown in the below figure. 

The CIPSA Scrum Framework – Interactions

A single Product Backlog with ordered items is continuously refined with cross-team members as part of the Cross-Team Backlog Refinement event. The Product Backlog with the Product Goal is presented by the CPO in the CIPSA Scrum Planning (meta) event of the upcoming Sprint. In this meeting, a CIPSA Sprint Backlog is created with the Product Backlog items that can be delivered by multiple teams in the upcoming Sprint. 

While individual Scrum teams are sprinting on their own, the Sprints are synchronized across the Scrum teams.

Post CIPSA Scrum Planning meeting, for each team, an individual team level Sprint Planning event takes place. This results in Team Sprint Backlog, for each team. 

Next, each team begins to work on the respective Team Sprint Backlog items. A CIPSA Daily Scrum meeting happens everyday and it’s preceded by individual team-level Daily Scrums for the individual teams. 

In the CIPSA Sprint Review meeting, a CIPSA Integrated Increment is presented to the entire CIPSA Scrum team and needed stakeholders. The CIPSA Sprint Review meeting replaces the individual Team Sprint Reviews. 

The last event for CIPSA Scrum Framework is CIPSA Sprint Retrospective. Here the CIPSA team reflects on the effectiveness of the CIPSA team as a whole and determines the improvements that can be taken-up. This meeting is preceded by Team Sprint Retrospective, which is specific to the individual teams.  

Video: The CIPSA Scrum Framework

The below video [duration: 6m:34s], explains the CIPSA Scrum Framework briefly with the roles, meta-events, and artifacts. 


Conclusion

As noted earlier, the CIPSA Scrum Framework extends the team-level Scrum. Hence, the CIPSA Scrum framework and team-level Scrum are in harmony. In fact, most of the events, roles and artifacts followed by Scrum are directly employed in the CIPSA Scrum Framework – but at scale.

The CIPSA Scrum Framework is practical, hands-on and uses a single software tool – MS Project Agile. This is the ONLY such framework in the world! With practical applicability, you have a much better learning, understanding and applicability in your scaled Scrum team or organization.


References

[1] *NEW* Certification Course: Certified In Practical Scaled Agile (CIPSA)

[2] Introducing Practical Scaled Agile Framework with CIPSA Certification

[3] New Practical Scaled Agile Framework – The CIPSA Framework Guide

[4] Scrum at Scale: Multiple Teams and Synchronized Scaled Sprints with MS Project Agile


Friday, August 30, 2024

New Practical Scaled Agile Framework – The CIPSA Framework Guide


In the earlier post, I informed about a new Practical Scaled Agile framework and associated certification –
Certified In Practical Scaled Agile (CIPSA). 

Today, I’m pleased to announce the public availability of the CIPSA Guide to Scaling Scrum or Kanban Teams with the MS Project Agile software. You can download the guide for free, read and use it.

Purpose of the CIPSA Guide

Building a large-scale product or service is complex work and involves multiple teams. Worldwide, a large number of scaled agile frameworks are available, but not a single one of them considers taking a practical, hands-on approach using software tools.

The Practical Scaled Agile (PSA) framework is built-upon the widely used Lean-Agile approaches such as Scrum or Kanban. The Lean-Agile approaches are documented in respective guides and beyond the scope of this guide. 

Certified in Practical Scaled Agile (CIPSA) is the direct certification associated with Practical Scaled Agile (PSA) framework. Hence, going forward, I’ll call it CIPSA (sip-sa) Framework. 

A CIPSA professional will have a deeper and much clearer understanding of CIPSA framework as the person would know in and out the Practical Scaled Agile using the software tool of MS Project Agile.   

This guide contains the definition of CIPSA framework. Each element of the framework serves a specific part in order to help teams and organizations scale the benefits of two popular Lean-Agile approaches: Scrum and Kanban.

This framework has two objectives:

  • Scaling using either Scrum or Kanban at the team level and understanding various scaling aspects. 
  • Strong emphasis with hands-on demonstration with software tools such as MS Project Agile. In fact, in the annexures you can find a number of real-world snapshots. 

A number of Scaled Agile practitioners and authors at ManagementYogi.com contributed to the development of the CIPSA framework. In particular, Satya Narayan Dash would like to thank John P S Oliver, Lakshmi Narayan Dash and others at ManagementYogi for their contributions in the development of this guide.

CIPSA Definition

Certified In Practical Scaled Agile (CIPSA) is a framework, in which a set of Lean-Agile teams with interdependencies operate together to build products or solutions for complex problems using hands-on software tools such as MS Project Agile. In this framework either Scrum or Kanban can be applied at the team level and it can be scaled to multiple teams.

With the CIPSA framework and as a CIPSA professional, one can scale multiple teams to deliver a single large product or service. In it, the Chief Product Owner manages a Single Product Backlog with individual Team Product Owners focused on individual Team Sprint Backlog or Kanban Backlog. 

This guide outlines various events, artifacts, commitments and accountabilities of the CIPSA framework. With scaling, multiple teams work on a single Product Backlog to build and deliver an Integrated Increment. The delivery can be within or at the end an Iteration (Sprint) as in Scrum or a cadence-based Release as in Kanban.

The CIPSA Guide 

The CIPSA Framework Guide (20 pages) is embedded in this page. It’s free to view, download and read. To view, just scroll using the vertical bar to go through the guide.


You can directly download the CIPSA Guide from the below link:

Download the CIPSA Framework Guide

No sign-in is required to download.

Video: Understanding the CIPSA framework Guide

The below video explains the guide and how to proceed with the guide, along with the contents. It's brief video, less than five minutes.


Final Words

This new Practical Scaled Agile Framework is radically different from others because it’s highly focused on practical applicability, hands-on usage while scaling and in-depth practical demonstration. All these will be part of the upcoming CIPSA Certification Course.

Below are some of the snippets taken from the above CIPSA Guide. 

The cross-team refined Product Backlog with MS Project Agile software is shown below. 

The multi-team, multi-Sprint view for the entire CIPSA Team is shown below. 

The CIPSA Sprint Burndown Chart for the entire CIPSA Team is shown below. Individual team level Burndown Chart can also be drawn and it's informed as part of the CIPSA Guide. 


You can check them all the available linked and downloadable document. Go on, it’s free to download and read. A CIPSA professional (CIPSA Certified) will know in and out of Scrum at Scale and Kanban at Scale using the CIPSA Framework and MS Project Agile software.

I welcome your feedback and inputs on the CIPSA Framework. It'll help many other Scaled Agile Practitioners. 

References

[1] New Practical Scaled Agile Framework: The CIPSA Framework Guide (FREE Download), By Satya Narayan Dash and ManagementYogi.com

[2] Article: Kanban at Scale Managing Multiple Kanban Teams and Boards with MS Project Agile, By Satya Narayan Dash, first published at MPUG.com 

[3] Article: Scrum at Scale: Multiple Teams and Synchronized Scaled Sprints with MS Project AgileBy Satya Narayan Dash, first published at MPUG.com


Thursday, August 15, 2024

New Practical Scaled Agile Framework – The CIPSA Framework


I’m pleased to announce the availability of ManagementYogi's Practical Scaled Agile Framework. The  Certified In Practical Scaled Agile (CIPSA) certification course is based on this framework. With CIPSA (sip-sa), you can scale to multiple Scrum or Kanban teams and deliver complex products or solutions.

It's the only framework and certification in the world, which informs how to scale with software tool(s). It's practical and hands-on. No other framework and/or certification course in the world provides it!

The Practical Scaled Agile framework has been under development since March of this year. It has gone through multiple iterations, a number of prototypes with reviews and article publication before it’s made public today. 

Why Non-Practical, Scaled Agile Frameworks are Ineffective?

Worldwide, a number of Scaled Agile frameworks are available. Unfortunately, not a single one of them informs how to do scaling in a practical, hands-on manner with software tool(s). This, indeed, is a big problem. Many Scaled Agile Practitioners, with whom I frequently interact, really don't know how to do scaling in the real-world as they are certified in theories.

For example, considering multiple Scrum teams sprinting together or multiple Kanban teams working together on a Product Backlog, a number of questions come-up:

  1. How do you to manage so many Sprints across multiple Scrum teams?
  2. How do you synchronize multiple Sprints in a cross-team environment?
  3. If Kanban is used at the team level, how would you scale?
  4. Can you track multiple teams (say five Scrum or Kanban teams) together at scale?
  5. Is it possible to see burndown/burnup charts for the entire scaled team and individual teams?

With ManagementYogi's Practical Scaled Agile framework, the answers to all the above questions are in affirmative – yes all of them! In addition, you can manage all the teams using a single software tool, which in our case is MS Project Agile. You can also manage assignment, planning, tracking, stands-ups, retros and reviews at scale. 

With this background, let me introduce the framework used for the Certified In Practical Scaled Agile (CIPSA) course. As our Practical Scaled Agile framework is directly associated with the CIPSA certification, going forward, I’ll call it CIPSA framework.

The CIPSA Framework

The CIPSA framework extends the team level Scrum or Kanban, helps to solve dependencies and enables collaboration and cross-team management. It extends them in the following ways. 

CIPSA Artifacts: All individual teams use a single and same Product Backlog. The Product Backlog items are visible to all the teams, but items are distributed across the teams. This backlog goes through refinement so that the individual teams can know which items to work upon in the next Sprint (Scrum) or Release (Kanban).

A CIPSA Backlog is built during the CIPSA Planning event and it's the sum of all work done by individual teams for the upcoming Sprint or Release. 

The third artifact is the CIPSA Integrated Increment, which is the sum of all integrated work from all teams and is given at the end of (or during) the Sprint or Release.

CIPSA Events: There are multiple events in the CIPSA framework, namely, CIPSA Backlog Refinement, CIPSA Planning, CIPSA Daily Stand-up, CIPSA Review and CIPSA Retrospective. Each of these events plays a critical role in managing Agile at scale. 

CIPSA Roles: There are two primarily roles in CIPSA complementing the accountabilities at the individual team level. They are Chief Product Owner and Principal Scrum Master (Scrum) or Principal Flow Master (Kanban).

At the individual Team level, there will be Product Owner, Scrum Master (or Flow Master) and Developers, some of whom play a major role in integration work. There is no separate integration team because developers are encouraged to be generalizing-specialists.

The CIPSA Framework – Graphical

The CIPSA framework is shown in the below figure. It shows the CIPSA artifacts and CIPSA events at scale. It also shows the artifacts and events at an individual team level, in dotted rectangles and circle.


The CIPSA Framework – Interactions

There is a single Product Backlog with ordered items and it’s continuously refined with cross-team members as part of the Cross-Team Backlog Refinement meta-event. The Product Backlog with the Product Goal is presented in the CIPSA Planning meta-event by the Chief Product Owner to the CIPSA team. In this meeting, a CIPSA Backlog is created with the Product Backlog items that can be delivered by multiple teams in the upcoming Sprint (Scrum) or Release (Kanban). In other words, the “what” part is decided here.

Post CIPSA Planning meeting, for each team, an individual Team Planning event takes place. The Product Backlog items taken for the respective team is broken down into individual tasks, which results in Team Backlog. A Team Backlog is available for every team. In other words, the “how” part is decided here. 

Next, each team begins to work on the respective Team Backlog. A CIPSA Daily Stand-up meeting happens everyday with cross-team members to synchronize the work, identify cross-team dependencies, issues and risks. The CIPSA Daily Stand-up is preceded by Individual Daily Stand-ups for the individual teams. 

In the CIPSA Review meta-event, a CIPSA Integrated Increment is presented for the entire CIPSA team and needed stakeholders. As the focus is on CIPSA Integrated Increment, CIPSA Review meeting replaces the individual Team Reviews. 

In the last meta-event of CIPSA Retrospective, the CIPSA team reflects on the effectiveness of the CIPSA team as a whole and determines the improvements that can be taken-up. The CIPSA Retrospective is preceded by Team Retrospectives, which are specific to the individual teams. 

The below video [duration: 7m] explains more on this new CIPSA Framework. 


Conclusion

As you’d have noticed, at the team level in CIPSA, one can use either Scrum or Kanban, while most Agile at Scale frameworks take only one. Also, quite a few scaled Agile frameworks employ a large number of artifacts (also events or ceremonies and roles), which are in violation of one of the four values of Agile Manifesto

"Working software or product over comprehensive documentation."

Above all, not a single Scaled Agile framework informs how to do scaling in a practical, hands-on manner. 

As we just saw with the figure and explained interactions, the CIPSA framework is simple to follow and you can employ it in your organization or teams. And you can do the entire scaling with the hands-on software tool of MS Project Agile.  

The CIPSA framework is free to use. However, when you use this framework or the concepts from this framework, I’d expect you to give due credit.

The detailed CIPSA framework guide is now available (August 30, 2024). The guide is free to download and use. The new CIPSA Certification Course is based on this framework.


References

[1] *NEW* Certification Course: Certified In Practical Scaled Agile (CIPSA), By ManagementYogi.com

[2] New Practical Scaled Agile Framework: The CIPSA Framework Guide (FREE Download), By Satya Narayan Dash and ManagementYogi.com

[3] Article: Kanban at Scale Managing Multiple Kanban Teams and Boards with MS Project Agile, By Satya Narayan Dash, first published at MPUG.com 

[4] Article: Scrum at Scale: Multiple Teams and Synchronized Scaled Sprints with MS Project AgileBy Satya Narayan Dash, first published at MPUG.com