Tuesday, December 28, 2021

Probabilistic Branching and Analysis in Risk Management


Imagine this scenario. You are going to a friend’s house for an important event. It is scheduled with a hard start, meaning you can’t have delays, but as you start traveling, you notice that your vehicle is running low on gasoline. A few options come to mind:

  • Continue driving because you think your available gasoline will suffice.
  • Fill-up your gasoline tank at a nearby gas station and then continue to travel.
  • Use a small gasoline container you have with you to fill-up your tank and then continue to travel.

Which option would you choose? What impact will your choice have for the duration of your trip? Can you reach your friend’s house on time?

These questions lead to a concept called probabilistic branching and analysis, which is used in quantitative risk analysis and management. Probabilistic branching is one of the ways to represent individual project risks. In every probabilistic branch, you model individual project risks and determine the overall project risk.

In this article, we’ll start with the fundamental concepts used in probabilistic branching. I’ll illustrate them with an example, show how to build a project plan with MS Project, help you create the needed probabilistic branching, and provide analysis and interpretations. In conclusion, we will see the significance of this concept.

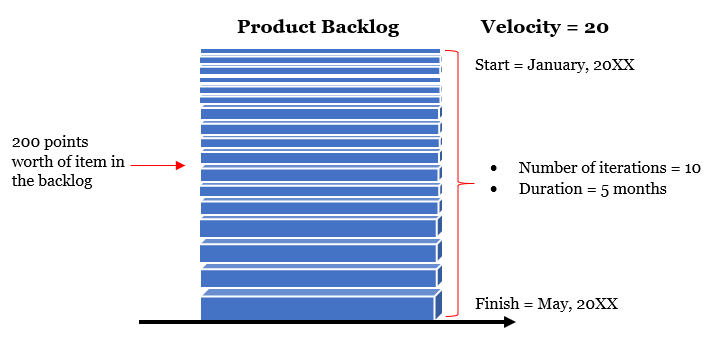
Uncertainty in Schedule Network Diagram

If you consider the options you had running low on gasoline while driving to your friend’s house, a simple network diagram can be built:

  • Start (milestone) – Starting from your home
  • Activity 1 – Starting to travel in your vehicle
  • Activity 2 (an option or branch) – Fill-up the tank at a nearby gas station
  • Activity 3 (another option or branch) – Use the small gas container available
  • Activity 4 – Continue travelling
  • End (milestone) – Reach your friend’s house

This seems pretty straightforward, but can you be sure of which option or branch you should take considering your desire to arrive at your friend’s house on-time? It may not be as straightforward as you think due to these activities being uncertain (may or may not happen). Uncertainties mean risks, and these risks can ultimately impact your objective (reaching your friend’s home on-time for the event). Hence, you can give probability or chance of occurrence to these risks on each of the branches.

When you assign probability values to each branch, you get a risk-adjusted schedule network diagram. We can modify our previous network diagram and represent as shown:

For “Activity 2” and “Activity 3,” I’ve assigned 30% and 40% chances, respectively, as existence values.

As you assign probability values to individual branches in response to the risks, the branches in the network diagram are known as probabilistic branches. You can have single or multiple probabilistic branches, though the latter is more frequently used.

Statistically Independent

Consider closely our first example:

Can you take two options or go for two branches simultaneously? In other words, would you fill-up the tank at a nearby gas station and use the small gas container available?

Obviously, you would not, as it doesn’t add any value for you. In fact, these are two independent outcomes–more specifically these outcomes are statistically independent. When you build a schedule network diagram (as shown in previous figure) with probabilistic branches, you model the risk of different outcomes occurring in a project in each branch.

Therefore, you could say probabilistic branching is best used when the risks occurring are statistically independent, meaning that one risk occurring in one branch is statistically independent of another risk occurring in another branch. This is also applicable when the events are mutually exclusive.

With this background and fundamentals explained, let’s look now at a real-time, project management example and get a bit deeper into probabilistic branching and analysis.

An Example

Let’s say that you and your team are excavating in an area to have a new garden prepared for a town’s residents. Your team will remove the soil, dig normally, then fill the hole, and finally plant grass to complete the work.

The tasks in this project will occur as shown in the below table. I’ve added duration details for each task or activity. Note that this example is taken from Primavera tutorial and modified with respect to MS Project usage and respective representations in this article.

What good can a project plan be, if we don’t know the total duration and end date? In such a case, scheduling software comes to our aid. Using Microsoft Project software, the plan looks as shown below.

The project is starting on January 4, 2021 and finishing on April 23, 2021. The duration is calculated to be 80 days.

So far, so good. There is no difficulty at all in creating a plan for this simple project.

But, as with many projects we manage, we have a twist!

Decide on the Branches

Let’s say that you get in touch with local experts and are informed of a possibility of archaeological remains in the area. Obviously, you just can’t go on and just start digging in this scenario. You may think of three possible scenarios or outcomes.

  1. Archaeological remains need expert removal.
  2. Archaeological remains can be discarded.
  3. No actual archaeological remains are found.

These scenarios can be modelled using probabilistic branching with three branches for three possible types of outcomes. All these outcomes, as you can see, are statistically independent.

Now, because these are probabilistic branches, there will be risks associated with each branch. At this point, we can confidently say the following:

  • Risk 1 (on Branch 1):
    • Archaeological remains are found that need expert removal.
    • Chance of occurrence (probability value) = 5%
  • Risk 2 (on Branch 2)
    • Archaeological remains are found, but can be discarded.
    • Chance of occurring = 25%
  • Risk 3 (on branch 3)
    • No archaeological remains are found.
    • Chance of occurring = 70%

As you see above, a probability value is assigned to each outcome or branch. You can decide on the probability values to be assigned subjectively and/or with expert opinion.

Add New Tasks to the Plan

Before we perform a risk analysis, we need to include all three of the above branches into the existing plan. In our plan, we have three new tasks representing the three outcomes or branches. The new tasks, along with existing tasks in the plan are:

  • Task – 1: Remove topsoil
  • Task – new: Remains found that need expert removal
  • Task – new: Expert removal
  • Task – new: Remains found but can be discarded
  • Task – 2: Dig normally
  • Task – 3: Fill hole
  • Task – 4: Plant grass

Did you notice the branching that occurred after the “Remove topsoil” task? After this task, we now have three possibilities or three branches: “Remains found that need expert removal,” “Expert removal,” and “Remains found but can be discarded.”

Next, let’s add these tasks to our MS Project plan with the following durations:

Remains found that need expert removal = 2 weeks

  • Expert removal = 4 weeks
  • Remains found that can be discarded = 2 weeks
  • After this step, we see the following modified plan within MS Project.

As shown in the above figure, with the addition of the new tasks, there is no change in the project duration, the critical path, or the finish date. However, we are not done with our plan yet.

Link the Tasks to the Existing Tasks

We have to link the newly inserted tasks and include the probabilistic branching for each of these tasks. I’ll be linking the tasks as follows:

  • Link the finish of “Remove topsoil” task to the start of “Remains found that need expert removal” task.
  • Link the finish of “Remains found that need expert removal” task to the start of “Expert removal” task.
  • Link the finish of “Expert removal” task to the start of “Fill hole” task.
  • Link the finish of “Remove topsoil” task to the start of “Remains found but can be discarded” task.
  • Link the finish of “Remains found that can be discarded” task to the start of ‘Fill Hole” task.

Logically, the above sequence makes sense. For example, if you remove the soil and require expert removal, then these tasks should be linked with FS dependency. Next, the task “Expert removal” will be linked to the task “Remains found that need expert removal” and so on.

After linking the tasks, the project plan as created with MS Project will result as shown below.

From the task “Remove topsoil,” we have three branches, [v.i.z]:

  • “Remains found that need expert removal”
  • “Remains found that can be discarded”
  • “Dig normally”

The branching from the “Remove topsoil” task has been highlighted in green in the above figure.

In the above modified plan, the project continues to start on the same date of January 4, 2021, but finishes on May 7, 2021 (it was April 23, 2021). The duration of our project has been recalculated as 90 days (from 80 days) and the critical path for the project has also changed.

Assign Probability to the Branches

Next, we will import this Microsoft project plan (.mpp) file into Primavera Risk Analysis software and assign the probability for each of these branches. We will use the following probability values, which we had decided upon earlier.

  • Remains are found that need expert removal – 5%
  • Remains found but can be discarded – 25%
  • Dig normally – 70%

The .mpp file will be seamlessly imported and will be depicted as follows:

This plan is an exact replica of the MS Project plan that we had created before with branching happening from the “Remove topsoil” task (highlighted in green). In each branch, probability values have been assigned, highlighted in the pink color in the graphical side of the Gantt chart and noted to the left of the bars.  The critical and non-critical tasks are also the same, highlighted in red and blue colors, respectively.

Run a Risk Analysis

Next, we have to simply run an analysis on the risk adjusted schedule model, and we will iterate the plan a number of times for simulation. The resultant histogram will show as below, post the simulation (known as the Monte Carlo simulation). I’ve formatted the histogram with color coding, highlighted arrow marks, and other data representation.

Let’s interpret the above graph as follows:

  • In our initial plan, the project was supposed to be completed by April 23, 2021. In the new plan, after adding the probabilistic branches, the end date moved to May 07, 2021.
  • The chance of completing the project by May 07, 2021 is 97%, which is mentioned in the “Highlighters” section in the table to the right. The corresponding line projections are highlighted in yellow arrow marks on the graph.
  • The project has a 50% chance of completing by April 21, 2021, and an 80% chance by April 28, 2021. These are highlighted in black (or bold) arrow marks on the graph.
  • A 100% chance of completion is possible by May 19, 2021, which is nearly two weeks beyond our planned finish date with probabilistic branches.

Conclusion

Let’s go back to our first example of travel to a friend’s house. It’s not a complex one, and it’s possible that you will be able to calculate the end result in your mind with probabilistic branches.

However, in the real-world, projects or programs are expected to be complex, and you will be needing management and simulation software tools to determine the impact of probabilistic branching to your finish time. To use these software tools, you need to have clarity on probability branching, understanding how to create branches and link with the existing tasks in the plan for analysis.

If you are aspiring to be a Risk Management Professional (RMP), you can expect questions pertaining to these concepts on the exam. On the other hand, if you are an aspiring Project Management Professional (PMP), you need to have a basic understanding on probabilistic branching and how it’s used as a tool, as well as the technique named “Representation of Uncertainty” in quantitative risk analysis.

It is my hope that, within this article, you received a sound understanding on when and why to use probabilistic branching, as well as how run an analysis with an example and hands-on software tools.

--

This article was first published by MPUG.com on 30th November, 2020. This is an updated version with the latest Primavera Risk Analysis software with latest Risk Management practices.


References

[1] Book: I Want To Be A RMP, The Plain and Simple Way, Second Edition, by Satya Narayan Dash

[2] Online Course: Practical RMP with Primavera Risk Analysis, Second Edition, by Satya Narayan Dash

[3] Online Course: RMP Live Lessons, Guaranteed Pass or Your Money Back, by Satya Narayan Dash

[4] Online Course: MS Project Live Lessons, by Satya Narayan Dash


Tuesday, December 21, 2021

Working with Multiple Sprints in an Agile Project


In projects or programs following the Scrum framework, you have to work with multiple Sprints. While working with multiple Sprints, as a hands-on user, you have to know certain intricacies and important points, without which your tracking and monitoring can be confusing. A number of Agile practitioners are also not aware how to track multiple Sprints with ease. In this article, we will see how to use multiple Sprints using the hands-on software tool of MS Project 2019 Agile.

The content of this course has been taken from my new course:

Mastering MS Project 2019 Agile

Similar concepts, in a more advanced way, will be applicable while going with Hybrid-Agile projects. However, in a Hybrid-Agile (or Hybrid-Scrum), you have to manage both the traditional and Agile parts, and hence, a much advanced understanding is needed. To learn how to build a Hybrid-Scrum project, you can use the advanced certification of Certified Hybrid-Agile Master course.

Now, let’s see how to manage multiple Sprints with a live project. I’ll be following the below steps:

  • Complete one Sprint (Sprint N)
  • Build on the next Sprint (Sprint N+1)
  • Visualize the next Sprint 
  • Track the next Sprint
  • Conclusion 

Complete One Sprint (Sprint N)

In the below project, I’ve planned for three Sprints using MS Project Agile features. The Agile features are available in MS Project Online Desktop Client. 

The Sprints planned for this project are shown below.


 The three Sprints (each two-weeks duration) are:

  • Sprint 1: From Monday 9th Sept, 22 to Sunday 25th Sept, 22
  • Sprint 2: From Monday 26th Sept, 22 to Sunday 9th Oct, 22
  • Sprint 3: From Monday 10th Oct, 22 to Sunday 23rd Oct, 22

Currently, we are mid-Sprint for Sprint 1 and the status date is set as Friday 16th Sept, 22. As on this date, we have the following percentage complete for this project in the Gantt Chart view. (Double click to have an enlarged view.)


As shown in the above figure:

  • There are three feature items in Sprint 1, “Login to the online trading system”, “Create a new user”, and “Edit an existing user”. The “Feature” custom flag field has been enabled for all these features. 
  • These features are 100%, 50% and 10% complete respectively.
  • A number of Daily Scrums are also complete.
  • The event of Sprint Planning is complete as on the status date.
Do note that I've change the calculation option for the project temporarily to "off" state. When you set it on, the cumulative % complete value will be shown to you properly. 

This can also be seen by going to the Current Sprint Board view by going to Sprint Tools > Sprints tab > Views group > Sprint > Current Sprint Board command. (Double click to have an enlarged view.)


As the Sprint 1 nears closure, we will close the tasks in the Sprint. For that:

  • We have to close all the Daily Scrums.
  • The features that we have completed (in our case, we have completed all features).
  • The other Scrum events such as Sprint Review and Sprint Retrospectives will also be closed.

After we close all the tasks, the Current Sprint Sheet view will come as shown below. You can go to this view from Sprint Tools > Sprints tab > Views group > Sprint > Current Sprint Sheet command. To close the items in the Sprint 1, you have to simply drag and drop the items. 


Build on the Next Sprint (Sprint N+1)

Next, we are going to build-up on the next Sprint, which in our case is Sprint 2. However, there are some important changes involved.

Before building on Sprint 2, I’ll rename the following ones:

  • Sprint Planning, Sprint Review, Sprint Retro and Daily Scrum. All will be appended with “1” in their names. 
  • This way, when we add other Sprints, we can distinguish among multiple Sprints. For example, for Sprint 2, I’ll have all the Scrum events appended with “2” in the task names.

To know how to build the Sprint Backlog in a step-by-step manner, you can refer to this article: Building A Sprint Backlog with All Scrum Events in MS Project Agile.

Now I’ll build the next Sprint (Sprint 2) and add the respective Scrum events and the resources. After I add the Scrum events, the Gantt Chart view will come as shown below.

As shown above:

  • We have two features – “Buy a stock” and “Sell a stock” in this Sprint 2.
  • We have added all the Scrum events. Each one is distinguished by the Sprint name, because of our changed naming conventions.

Note: From the beginning you can have a naming convention for the Scrum event matching the Sprint names. However, as we started with the basic one, I’ve changed later for Sprint 2 and a similar naming convention will be applicable for subsequent Sprints.

Visualize the Next Sprint

Next, we can visualize the Sprint 2, which is our current Sprint. However, for that again you have to change the current date/status date.

As you change the dates, the Sprint 2 becomes the Current Sprint and hence, now it can be visualized in the Current Sprint Board view.


 This also can be in the Current Sprint Sheet view for Sprint 2 as shown below.


Track the Next Sprint

Finally, we have to track the Current Sprint (Sprint 2). For that again we will change the Status Date to a date within the Sprint 2 and do the tracking. 

The status date can be set by going to the Project tab > Status group > Status Date command. I’ll change the status date to Friday 30th Sept, 22, which is the end of the first week of the Sprint.

Also, remember that when you track, track the Sprint items in the Board Views. 

As shown in the above figure, for Sprint 2:

  • A number of Daily Scrums are completed.
  • The feature “Buy a stock” has been completed.
  • The next feature “Sell a stock” is currently in progress and so on.

The tracking information, the cumulative % complete for the Sprint 2 can be seen in the Current Sprint Sheet view. 

If you switch to the Sprint Planning Board view, it will have information for all the Sprints and you’ll have the following visualization. You can go to this view from Sprint Tools > Sprints tab > Views group > Planning > Sprint Planning Board command.


Interpreting the above figure, one can say:

  • Sprint 1 column is empty, because this Sprint is complete.
  • Sprint 2 is currently under progress. 
  • Sprint 3 is yet to start-off as we have just two features without any Scrum events.

Conclusion

With MS Project Agile, you can plan, work, manage and track as many Sprints as you want. Many Agile practitioners are not aware of the complete functionalities available. Hence, they find it difficult (and sometimes even fear!) to operate with MS Project with its Agile features.

I hope with this article, you received a fair idea on how to work with multiple Sprints. You can plan, build and manage as many Sprints as you want and move towards the end goal of your Agile project.


References

[1] NEW Online Course: Mastering MS Project 2019 Agile (Scrum and Kanban), by Satya Narayan Dash 

[2] NEW Certification Course: Certified Hybrid-Agile Master with MS Project, by Satya Narayan Dash


Wednesday, December 15, 2021

A Deep Dive into Risk Matrix Reporting for Risk Managers


Working with projects, programs, and portfolios, generates a lot of data. For example, in project management you have data such as planned start, planned cost, planned story points, total number of risks, etc. That said, data on its own doesn’t give you or a stakeholder any real value. The real value comes when you analyze the data and extract intelligence out of it. This, in turn, becomes valuable information. I’m referring to things such as start variance, cost variance, and the number of high priority vs number of low priority risks.

Even so, information on its own is also insufficient. It has to be communicated in the right way and with a right format. Management practitioners call the information reports, which in turn, facilitate effective communication.

In this article, we will learn about one particular report, the Risk Matrix Report. This is widely used by risk management practitioners across projects, programs and portfolios.

In the following article, I’ll first outline the foundational blocks of creating the risk matrix, followed by building a risk matrix scoring scheme (instrumental in plotting the risk matrix). Next, I’ll inform how to generate pre- and post-mitigated risk matrix reports. And finally, I’ll share a few advanced concepts such as using other risk assessment parameters or generating a butterfly risk matrix report. In many places, I’ll be using the Primavera Risk Analysis tool to create these risk matrix reports. You can just as easily use MS Word and/or MS Excel to create such reports.

Before we proceed, let’s look at the definition of an individual risk. As per Project Management Institute (PMI):

A risk is an uncertain event or condition that, if it occurs, will have a positive or negative impact on one or more objectives of the project.

As you can see, a risk has two key elements: an element of uncertainty or probability, and an element of impact or consequence. Based on this, we can consider a few foundational concepts next, which will help us to build the risk matrix. 

The Probability Scales

Probability of a risk is the evaluated chance that an event will occur given existing conditions. You could also say probability is the chance or likelihood of occurrence. The estimated probability of an individual risk is tied to a well-defined risk event or condition.

The probability of risk occurrence is decided in the risk management planning process, and it’s applicable for both threats (negative risks) and opportunities (positive risks). The probability scale can be numeric, textual, or a combination of both. Sample probability scales with associated textual values are shown in the below table.


As you can see, the probability of risk occurrence is considered to be “Very High” if there is more than an 80% chance of the risk occurring, whereas probability will be “Very Low” if the risk has a 1% to 10% chance of occurrence. 

The Impact Scales

Another arm of individual risk is the impact of the risk to the project, program, or portfolio if the risk occurs and is fully realized. Risk impact is measured as a deviation from the project’s scope, schedule, cost, and performance baselines or objectives. You could say risk impact is the consequence or effect of the risk–if and when the risk happens.

While developing impact scales, you have to consider the impact type. This is likely defined in terms of scope, cost, quality, etc., whereas impact scales can be numeric, textual, or in ranges based on impact types. Every impact scale is clearly defined with deviations from the expected baseline data.

Like probability scales, impact scales are also defined in the risk management planning process. They are applicable to both threats and opportunities, too. An example impact scale with associated numeric and textual values is shown in the below table.

Notice that the schedule impact for a risk is considered to be “Very High” if the schedule is delayed by more than 30 days, whereas the impact is “Very Low” if the schedule is delayed by 1 to 5 days. Similarly, other impact types with associated scales are defined in the above table. 

The Appetite or Tolerance Scales

Another scale to look at when building a risk matrix is the risk appetite scale or tolerance scale. Risk appetite informs the degree of uncertainty a stakeholder is willing to accept in anticipation of a reward, whereas risk tolerance is the degree of uncertainty a stakeholder will withstand. This is typically expressed in ranges. The latter is less frequently used now, compared to the former. However, I’ll use appetite and tolerance interchangeably.

It is wise to determine appetite levels before getting too far into building a risk matrix. This is because they drive color coding for the risks. The color coding used will be dependent on the risk score, which is the multiplication of probability and impact values of a risk. This calculation and subsequent color assignment, in turn, will enable prioritizing of risks in the risk matrix. For example, the higher the risk score, the higher the risk priority. A sample for tolerance/appetite scales with associated risk scores and color coding is shown in the below table.

Building Risk Matrix with a Scoring Scheme

Now that we have looked at the foundational blocks available for creating a Risk Matrix, let’s go ahead and create one. A risk matrix can be in a 5×4, 5×3, or 3×4 grid format. For the sake of example, we will create a 5×5 probability and impact grid. This risk matrix is also known as risk assessment matrix or probability-impact (PI) matrix.

A 5×5 risk matrix is shown in the below figure. The probability and impact scoring values in the risk matrix are calculated as follows:

  • Probability factors from VL to VH as 1, 3, 5, 7, and 9, respectively.
  • Impact factors from VL to VH as 0.5, 1, 2, 4 and 8, respectively.
  • The numbers generated by multiplying the probability and impact factors are rounded-up to the nearest whole number.

One can take a simple linear scale for both probability and impact scoring values, such 1, 2, 3, 4, and 5. However, as seen in various situations in the real world, it’s usually better represented with exponential values particularly for the impact—just as I have shown here with 0.5, 1, 2, 4, and 8 (numbers are exponentially increasing at a 2x rate).


The risk score is calculated by multiplying probability and impact factors in the above table. For a risk with a “High %” probability and “Medium” impact, the score is figured as shown below:

Probability (High %) × Impact (Medium)

= 7 × 2

= 14

Now, I’ll demonstrate how to apply the color coding scheme based on the Risk Appetite or Tolerance Scales, which we have already discussed. These results are shown in the below table.


Now we have a Risk Matrix Scoring Scheme with three zones for prioritization of risks. The three zones are as follows:

  • High priority zones (in red)
  • Medium priority zones (in yellow)
  • Low priority zones (in green)

Using the risk analysis tool, the risk matrix scoring scheme will result as shown below.

A key thing to note in the above figure is this: going forward, the risk score will be based on the “Highest Impact” value. For example, if there are three different impacts for scope, schedule, and cost as High (H), Very High (VH), and Medium (M), respectively, then the overall impact of the risk will be Very High (VH). This is because the schedule has the highest impact (Very High) across all the impact types. 

Generating a Pre-mitigated Risk Matrix Report

Finally, it’s time to generate the risk matrix reports. To generate these, I take the actual data and information from the Risk Register. The risk register is a repository where the details of individual project risks are recorded along with all their respective fields.

In our case, the risk register is shown below using the risk analysis tool. At this stage, the risks are not mitigated, and therefore, you could say the register is a pre-mitigated risk register.

Our risk register has in total 7 risks (from Risk 001 to Risk 007), with various fields populated such as risk ID, risk type, risk title, risk probability, impacts, and risk score. Risk type denotes the risk as a threat (T) or an opportunity (O). Let’s take one risk to understand how the risk score is calculated. Do note that based on the risk score, the risk will be plotted in the risk matrix.

For Risk 001 (Title – Poor understanding of design specification):

  • Probability = Medium (M)
  • Schedule impact = High (H)
  • Cost impact = Medium (M)
  • Performance impact = Very High (VH)
  • Scope impact = High (H)
  • Quality impact = High (H)

Hence, the overall impact of Risk 001 is Very High (VH), as we are considering the “Highest Impact” value for the risk score.

The pre-mitigated risk score for Risk 001 will be as follows:

= Probability × Impact

= Medium (M) × Very High (VH)

= 5 * 8

= 40

Similarly, risk scores have been calculated for the rest of the six individual project risks.

When this data from the above risk register is compiled and the pre-mitigated risk matrix report is generated, we will get the following matrix:

As shown above, Risk 004, Risk 001, and Risk 005 are the top three high priority risks, followed by Risk 007, Risk 002, and Risk 006, respectively. Risk 003 is of the least priority. In other words, as I’ve noted earlier, a risk matrix helps with risk prioritization and visually shows prioritized risks or risk levels. 

Generating a Post-mitigated Risk Matrix Report

The risk register, after its creation during risk identification, passes through many risk management processes: risk qualification, risk quantification, risk response planning, and risk response implementation. The fields in the risk register are updated accordingly, as well.

As you implement risk responses and take action to mitigate probability and/or impact of a risk, the score of each risk is hopefully brought down.

This, in turn, creates the post-mitigated risk register, which is shown below. 

Here, we have pulled-down the risk score for the risks in the register. As you can see, Risk 001’s risk score is now “4” (earlier it was “40”), the risk score for Risk 005 is now “2” (earlier it was “56”), and so on. The score calculation follows the same process I outlined above while discussing the pre-mitigated risk register.

For example, post mitigation, for Risk 001 (Title – Poor understanding of design specification) is as follows:

  • Probability = Very Low (VL)
  • Schedule impact = High (H)
  • Cost impact = Medium (M)
  • Performance impact = Very Low (VL)
  • Scope impact = Medium (M)
  • Quality impact = Medium (M)

Hence, the overall impact is High (H), as we are considering the “Highest Impact” value for the risk score.

The post-mitigated risk score for Risk 001 will be:

= Probability × Impact

= Very Low (VL) × High (H)

= 1 * 4

= 4

As we take data from the register and generate the post-mitigated risk matrix report, it will show as below. 


Risk scores for the three high priority risks—Risk 004, Risk 001, and Risk 005, are now brought significantly down. Similarly, the same has occurred for Risk 007 and Risk 002.

Using Additional Risk Parameters

Risk management has a number of additions and changes in the latest edition of the PMBOK Guide. You, as a risk management practitioner, can now include additional risk assessment parameters such as risk manageability, risk urgency, risk propinquity, etc.

Let’s consider one such parameter—Risk Manageability, which informs the ease with which the risk can be managed. In other words, if the risk is easily manageable, the risk manageability score will be higher. Risk manageability is only scaled with weighting factors, a sample of which is shown below. 

Here, a risk considered “difficult” to manage will have a lower weighting factor as compared to a risk considered “very easy” to manage. Correspondingly, this risk manageability value will impact the score of the risk being considered.

Let’s look at one risk from our pre-mitigated risk register to understand. For Risk 001, risk manageability is valued as “difficult.” As you apply the risk manageability factor to this risk, the risk score will change from “40” to “32.”

For Risk 001 (Title – Poor understanding of design specification), the calculation is determined as shown below:

  • Earlier pre-mitigated score = 40.
  • Risk manageability value is “difficult,” so the weighting factor = 0.8
  • New pre-mitigated score = 40 × 0.8 = 32

This is depicted in the pre-mitigated risk register as shown below. 

For Risk 001, the pre-mitigated score is now 32. Earlier the risk score was 40. And for Risk 006, which is an opportunity, the pre-mitigated risk score has gone up to 8, from an earlier value of 7. Did you notice? At this stage it is worth noting that risk management is fundamentally about minimizing individual project threats and maximizing the individual project opportunities.

If you are using other risk assessment parameters such as risk urgency, risk proximity, etc., you can model these parameters in the risk register, calculate the pre-mitigated risk scores, and then proceed with risk response implementation to calculate the final, post-mitigate risks scores. 

Butterfly Risk Matrix Report

Many times, stakeholders want to see both the threats and opportunities in a single risk matrix report. In such cases, a butterfly risk matrix report can be used. It is called a butterfly matrix because of its shape, (the two wings on either side resembles a butterfly).

The below pre-mitigation butterfly matrix is generated from the pre-mitigated risk register’s data with the help of a risk analysis tool.


 Let’s understand how the above butterfly risk matrix can be read and interpreted.

  • The matrix is divided into two wings—the left wing is for opportunities or positive risks, whereas the right wing is for threats or negative risks.
  • For both wings, in the X-axis, we have the impact, whereas on the Y-axis, we have the probability.
  • In our case, Risk 006 is an opportunity as shown in the pre-mitigated risk register. Hence, it’s plotted on the left wing.
  • Again, in our example, Risk 005, Risk 004, Risk 001, Risk 007, Risk 002, and Risk 003 are all threats. Hence, they are plotted on the right wing.
  • The prioritization of risk along with the color-coded highlighting and counts are shown on both sides of the butterfly matrix.

Like a pre-mitigation butterfly matrix report, you can also create a post-mitigation butterfly matrix.

Conclusion

Irrespective of the number of processes, practices, and principles that you follow for risk management in your organization, risk matrix reports are likely to be useful in managing and monitoring risks. Additionally, if you are an aspiring Risk Management Professional (RMP), you will need to understand how risk matrix reports are interpreted. In fact, on the exam for such, you should expect situational, as well as graphical questions, on this topic. 

Finally, if you are working as a Risk Manager or Resilience Manager in an organization, I hope this article gives you an in-depth understanding on Risk Matrix Reporting.

--

This article was first published by MPUG.com on 14th April, 2020. This is an updated version with the latest Primavera Risk Analysis software with latest Risk Management practices.


References

[1] Online Course: Practical Risk Management Professional (RMP) with Primavera Risk Analysis, by Satya Narayan Dash

[2] Book: I Want To Be A RMP: The Plain and Simple Way To Be A RMP, 2nd Edition, by Satya Narayan Dash

[3] Online Course: RMP Live Lessons, Guaranteed Pass or Your Money Back, by Satya Narayan Dash

[4] Project Management Body of Knowledge (PMBOK) Guide, 6th Edition, by Project Management Institute (PMI)

[5] The Standard for Risk Management in Portfolios, Programs, and Projects, by Project Management Institute (PMI).


Saturday, December 11, 2021

Understanding Velocity in Agile Approaches with MS Project Agile


There are certain questions that usually surface in almost every project regardless of the type, domain considered, technology used, complexities associated, or strategic significance. These questions are:

  • When will the project be completed?
  • What are the items you can deliver by the end of the project?
  • What are the items the team can take for the forthcoming release or iteration?

These questions fundamentally boil-down to the schedule of the project, and what and when the team can deliver over this schedule. As you can see, the first question is about the duration of the project, the next is about scope, and the final one asks about plans to be delivered.

In Agile approaches, the concept of velocity helps to address such questions. In this piece, I will start with the basics and dive a bit deeper to help you understand this concept. Towards the later part of this article, I will show you how to calculate velocity with MS Project. I will conclude with certain key characteristics. 

Note: For hands-on, in-depth understanding of velocity and associated concepts, you can refer:

With this course, you will know various aspects of velocity such as writing features in as stories (will convert to velocity), velocity histograms,  Sprint/iteration velocity, Release velocity, Release velocity along with Sprint Velocity, among others. 

Basics of Velocity

Velocity is the measure of product backlog items (PBI) delivered in an iteration. It’s the rate at which the PBIs are delivered, validated, and accepted according to the definition of “done,” per iteration. In other words, you can say that velocity is a measure of a team’s rate of progress. You sum up the PBIs delivered and you get velocity. If the item is not completed, it won’t count toward velocity.

The PBIs in a backlog can be features, bugs, enhancements, spikes, and refactoring, among others. You may consider all of these as part of velocity or decide to include some. Irrespective of the decision you make along with your team, it’s important to always maintain transparency on this topic.

Let’s explore an example to understand velocity better. Let’s say that in an iteration, your team delivered PBI-10, PBI-11, and PBI-3, which are estimated at 3, 8, and 5 story points, respectively. Velocity for the iteration would be 16 or 16 story points, as calculated below.

Velocity = Estimate for PBI10 + Estimate for PBI11 + Estimate for PBI3

Velocity = 3 + 8 + 5

Velocity = 16 (or 16 story points)

If you have an incomplete item, it won’t be considered for velocity calculation. For example, if PBI-11 remains incomplete at the of the iteration, the velocity will be 8 or 8 story points.

So, how does velocity help in answering the questions raised earlier, those of when the project will be complete and what items can be delivered?

Going back to our example, let’s assume the product backlog has 200 points worth of work, your velocity is 20 points per iteration, and each iteration has two-weeks duration.

Number of iterations needed = 200 / 20

Number of iterations needed = 10

We will be needing 10 iterations or 20 weeks to complete the work items in this backlog. If you start working on the backlog during the month of January, you will be able to complete it by end of May, which is shown in the below figure.

Velocity in Ranges and Confidence Levels

It’s possible that velocity can fluctuate for a team over the duration of a project or release. Considering our previous example, it can be as low as 15 (minimum) or as high as 25 (maximum).

No one exactly knows what the future entails. There can be inclusion of new high priority items, a change in a 3rd party component which introduces a number of bugs, or changes in team members for the project, etc. Hence, it’s a good practice to calculate the velocity range, in place of thinking of it in absolute numbers. For example, you can say that the team’s velocity range is between 15 to 25 story points. With this approach, you are conveying that it’s an estimation and nothing is absolutely certain.

Next, let’s see how the duration changes with range in velocity numbers. With a velocity of 15, you will be needing around 14 iterations to complete (200 divided by 15 and rounded it to 14) the backlog items, whereas with a velocity of 25, the team will be needing just 8 iterations to complete the project (200 divided by 25). In the first case, it will take seven months to complete the backlog. Whereas in the latter case, it will take four months. You can graphically represent it as shown in the below figure.


Our velocity estimation can be refined further by looking at confidence intervals. For example, you can say the team can complete the initial 80 points with 90% confidence, whereas the next 70 points worth of work can be done with 50% confidence, and finally, the last 50 points worth of work with 10% or with very little confidence.

Why provide the confidence levels? So that work items towards the bottom of the backlog are not clearly defined and estimated, i.e., they are coarse grained, and very big–usually epics. Estimation for such work items will be 40, 80, or 100 story points. As you can see, confidence levels helps in setting proper stakeholder expectations. 

Why the Term “Velocity”?

As I teach and interact with Agile practitioners, I get asked about the terminology of “velocity” often, and why it’s not called “speed”? After all, it’s the rate of progress or the items a team has completed in an iteration, which, in a way, informs the speed of delivery.

There is a subtle difference between speed and velocity. Speed is a scalar concept, whereas velocity is a vector concept. Speeds tells how fast you are moving or covering a distance, whereas velocity tells how fast you are moving in a particular direction. Speed is direction agnostic, whereas velocity is direction aware.

Some may also ask, what direction is the team moving towards when the term “velocity” is used? The direction is propelled by the product vision. The vision of the product (or service, or result), to be delivered by the project, is outlined in the beginning stages of the project. Vision tells us for whom the product is being built, what purpose it’s going to serve, and what benefits it will deliver with one or more compelling differentiators. With every iteration (or Sprint, if considering Scrum framework), you are moving one step closer to this vision/goal of the final product. Metaphorically, velocity is an apt term in place of speed.


Estimating Velocity

In our first example, we saw a velocity of 20. You might be wondering how I arrived at this number? This question leads to velocity estimation. Velocity can be estimated in a variety of ways. Let’s check a couple of them. 

Using Historical Information

Historical information can be gathered from similar, previous projects in the organization. When you consider historical information, there should be little (or almost no) variations among team capability, technology and domain used, product owner involvement, etc. This technique is useful when your team is totally new to the project.

There can be drawbacks with this technique because it’s not the current team’s own data, and when actual velocity comes up, estimated velocity may not match with historical information. One could say that using historical information is a type of Analogous Estimate.

Observing Actual Velocity

In this approach, iterations are actually run to determine the velocity. The team usually runs at least three iterations and then determines the average velocity.

Compared to the previous approach of using historical information, velocity is calculated actually using the real data. There can be drawbacks to this approach, such as  business executives finding it difficult to wait for at least three iterations to get an estimate, or a duration estimation needed even though the project may not be executed immediately. In such a case, you can have a forecasted velocity.

Whatever approach you may take to estimate the velocity, following are some practices worth noting:

  • Discard historical information when you find the actual velocity.
  • Calculate the average velocity, but communicate in ranges.
  • Update the velocity at the end of every iteration.

Working with MS Project 2019 Agile

Both Scrum and Kanban don’t have any concept of velocity as a practice or a framework concept, but velocity is a widely used metric by many Agile teams and many software tools. MS Project software, which supports both Scrum and Kanban, doesn’t have velocity as an explicit metric. However, you can easily determine velocity with few customizations.

By way of illustration of this, we will use a Scrum framework and follow four steps. 

Step – 1: Create Needed Custom Fields

Product backlog items can be features, bugs, enhancements, and even documentation related to the work. For the sake of our example, I’ll only consider the features which will be estimated in story points. In our case, we will create two custom fields:

  • Feature (flag) – a Boolean/flag custom field. If yes, then the PBI is a feature; otherwise it can be any other PBI type.
  • Story Points – a number custom field, as story points are calculated in numbers. If you are not going with story points, you can have feature points or simply, points.

When you create the custom field for “feature,” it shows as captured below:

When creating custom field for “story points,” ensure that the calculation for rows and summary tasks is rolled-up. This is depicted in the below figure: 

Another custom field is needed for velocity calculation (a number customer field), which we’ll simply call Velocity. The velocity will be calculated only if the PBI is a feature and it is 100% complete. This you can translate into a formula.

Note that for this velocity custom field, the calculation for rows and summary tasks is rolled-up. This is depicted below.


Step – 2: Use the Built-In Groups and Filters

The MS Project software comes with a number of built-in groups and filters. We will take one such group, Sprint.

Before applying the grouping, we have the following Backlog with items distributed across various Sprints. You can drag and drop the backlog items and put them into respective Sprints as shown in the Sprint Planning Board view.


In the Sprint Planning Sheet view, we have the following depiction. As shown below, the items are populated with the values in the respective fields.


We have story points estimated for PBIs, and a field for whether the PBI is a feature. The PBI priority has been set with product prioritization techniques, used by Product Managers.

Apply the in-built group: Sprint, which results in the below view.


Step – 3: Calculate the Story Points for a Sprint

As shown in the previous figure for individual Sprints, the story points have been cumulatively added and rolled-up to the Sprint level. For example:

Sprint 1:

  • Three features, “Log into the online trading system,” “Create a new user,” and “Buy a stock,” are estimated at five story points (SPs), 8 SPs, and 5 SPs, respectively.
  • Add them together, and we have a total 18 story points worth of work.

Sprint 2:

  • Three features, as well, are: “Logout of the system,” “Sell a stock,” and “Transfer a stock,” each of which are estimated at 5 SPs.
  • As you add them up together, we have a total of 15 story points worth of work.

Similarly, it’s for the other Sprints and the entire product backlog, which has, in total, 208 SPs worth of work. 

Step – 4: Determine the Actual Velocity for a Sprint

The final step is to calculate the velocity for the Sprint. For this purpose, we will add the velocity custom field, which we created earlier.


As the team starts sprinting and completes the features, only then will the velocity field be populated. Let’s say at the end of the Sprint, the team has completed all the features. The velocity will be 18, as shown the below figure.


Characteristics of Velocity

In conclusion, I will summarize certain key characteristics associated with velocity, as follows:

  • Only completed and accepted work is counted towards velocity.
  • Velocity is a measure of output (the size of what delivered, such as a 20 story points delivered). It’s not a measure of outcome (translating to value).
  • It’s an empirical observation of the team’s capacity to complete work per iteration. As noted earlier, even though you use historical information, discard that immediately as soon as you have actual data to work with.
  • Velocity is comparable across items for a given team on a given project. For example, while you can compare the same team’s velocity over iterations, you can’t compare two separate teams’ velocities.
  • Velocity is not a measure of productivity, as that would be a trap and a subjective estimate, not an objective one.

--

This article was first published by MPUG.com on 3rd March, 2020. This is an updated version with latest MS Project Agile features.

References:

[1] Video Course: Mastering MS Project 2019 Agile, by Satya Narayan Dash.

[2] Video Course: ACP Live Lessons, Guaranteed Pass, by Satya Narayan Dash.

[3] Book: I Want To Be A PMI-ACP: The Plain and Simple Way, by Satya Narayan Dash.

[4] Video Course: Microsoft Project Live Lessons, by Satya Narayan Dash.

Videos Courses on MS Project Agile and Hybrid-Agile: 

[1] Mastering MS Project Agile (Scrum and Kanban) 

[2] Certified Hybrid-Agile Master Professional