Sunday, July 31, 2022

The Rhythmic Dance of Agile with Cadence


Odissi (pronounced o-dee-shee) is one of the classical dances of India from the coastal state of Odisha. Based on archeological evidence, it’s possibly the oldest living classical Indian dance. The Massachusetts Institute of Technology (MIT), US, notes in its web-archives that Odissi is two to three thousand years old. In recent decades, it’s been popularized by well-known artists—one being singer, Michael Jackson. In his famous 1991 song, Black or White, Jackson danced a fusion of Odissi and pop-rock, with his companion dancer, on the highways of the United States.

A unique dance position in Odissi is “tri-bhangi” (‘tri’ meaning three and “bhangi” meaning stance or position). Together, loosely translated, it means “thrice deflected stance,” and is quite difficult to master. In this position, there is a three- or tri-fold shape in the body forming an S-curve. To get into this stance, the upper part of the body such as head and hands are rhythmically moving in one direction, while the middle and lower parts of the body move in other directions with different rhythms. The joy of the dance for the viewer and performer alike comes through, in that parts of the dancer’s body are moving in rhythm, as well as the entire body moving, at large.

Now, you might be thinking what exactly a dance has to do with cadence in Agile?

Let’s start first with the definition of cadence.


Cadence – Definition and Basics
*** UPDATED ***

One can define cadence in Agile as follows:
Cadence is a regular, predictable pattern of development work in Agile. It’s timeboxed and comes with consistent duration to help scheduling.  

Simply put, cadence is a rhythm of execution. The concept of cadence in Agile is suitably explained with a dance. With dance, art meets science, and in the same way, management meets life.

Like dance, cadence creates a predictable pattern of work or rhythm of execution.

Also, like dance, which can come with different rhythms for the different parts of the dancer’s body, cadence can be different for the different practices of Agile development. For example, you can have one cadence for Agile planning events, a separate cadence for Agile demonstrations or reviews, and a completely different cadence for Agile retrospectives. You can also have a single cadence for all events, for example, every two weeks, you may have planning, demonstrations, and retrospectives. We will explore a number of such situations shortly.

Taking another example from our own human bodies, many organs function in various cadences. For example, our heart beats on a cadence, our breathing or respiratory organ works on another, and so on.  In fact, if these vital organs of the body don’t operate on their respective cadences, life won’t exist!
That said, let’s explore how cadence can be applied in various Agile frameworks.

Working with Single Cadence
We have learned before, there can be two Lean-Agile frameworks at a high-level: iteration-based and flow-based. Irrespective of the type, cadence can be applied to development effort.

In iteration-based Agile, such as Extreme Programming (XP) or Scrum, an iteration length is prescribed. For example, in Scrum, where an iteration is called Sprint, the iteration length is usually less than a month (four weeks) as per my article on the latest Scrum Guide, 2020, and it’s always timeboxed.

When you keep the length of the iteration fixed over a period (and it is a good practice to do so), you develop a cadence. As we saw in our initial definition, it’s a predictable, regular pattern or rhythm of execution. When the iterations are repeated consistently over a period, a cadence is formed. In other words, in an iteration-based Agile, cadence is created with iterations, as depicted in the below figure.


Considering Scrum framework, the cadence is timeboxed, usually from two to four weeks and is created by a Sprint. Within the Sprint, you have a cadence, and it is a single one. When we modify it for Scrum, the figure will change to what is shown below.


Working with Multiple Cadences
Whereas in iteration-based Agile, the cadence is formed by iterations; in flow-based approaches such as Kanban, timeboxing is not prescribed. However, you can apply cadence here, too. You can choose when you do planning, when to release, and when to do a retrospective. You can decide on a set basis, such as a release every Friday, or you may choose an on-demand basis. It can also be based on when there is something valuable to release.

Below is an example of a team working with three cadences.


As shown above, we have:

  • Every week the team releases whatever is ready for release,
  • Every second week they have planning, and
  • Every third week, they have a retrospective.

Working with Event-Based Cadence

A project manager could develop cadence based on events, as well. This approach is employed in flow-based Agile or, if the stakeholders decide to do so, in an iteration-based Agile. Below is a case depicting that. A planning meeting is started when the team runs out of items to complete. A release is triggered whenever the team has a set of features ready. A retrospective is done every two to four weeks.
 
Looking at the above figure, one could say that these are the event-based cadences:


Cadence and Project Life Cycle *** NEW ***
The cadence is quite important because along with development approach, it determines the project life cycle! In this case, I’m considering the delivery cadence. This is shown in the below figure. 

The delivery cadence informs how frequently the project deliverables are given. The deliverables can be given one-time (single delivery), multiple times (multiple deliveries), or periodically (periodic deliveries), among others.

Also remember that, development approaches can be many such as predictive (waterfall), adaptive (Agile) or incremental. A project life cycle can also be many types based on the development approaches. A project life cycle can be predictive, adaptive, hybrid (combination of predictive and adaptive) etc. You can learn more on development life cycle and project life cycle in this article.

Consider having a single delivery cadence, where the delivery will happen only at the end of the project. In such a case, one would go with a predictive life cycle. Similarly, considering multiple deliveries during development of software component for a car project can result in a hybrid life cycle.

Cadence and Intensity of Work
We know that an alert and healthy staff will always be more productive than if folks are tired or burnt out. For that, a sustainable pace is needed. However, in sequential/waterfall development model, this is not always the case.

Many times, it has been found that teams really can’t or don’t work with full productivity at the beginning of a project, especially, and it’s likely that they will start spending long hours and sleepless nights towards the end. In other words, the intensity of work goes-up towards the end of the project. Note the depiction of this in the below figure.
 

This late work towards the end of a project is known as death march, and it refers to the burnout and exhaustion of the team members. Obviously, this type of late work can lead to high attrition and the loss of talented resources. The Agile framework intentionally tries to put a stop to this risk. Hence, one of the principles of Agile Manifesto reads as:

Agile processes promote sustainable development. The sponsors, developers, and users should be able to maintain a constant pace indefinitely.

With short iterations, intense work doesn’t peak towards the middle or end of the project, but remains steady throughout the project’s life cycle. This is because a project consisting of multiple iterations, will have similar intensity densities.

Cadence – Advantages

There are many advantages of cadence, some of which are:

  • It is easier for project managers to manage with an understanding of cadence in place. Imagine having twenty planning meetings for twenty iterations; with iterations operating at one-cadence, scheduling becomes less challenging.
  • It builds muscle memory. When you have a rhythmic set of activities, it builds familiarity, and keeps the mind free of trivial (but, needed) details. When the mind is free of such, time is better spent on value-added work.
  • There is a big reduction in coordination, which is an offshoot of the first advantage. Some critics of Agile say there is a large overhead involved, due to the need for coordination with short iterations. With cadence, this overhead is guaranteed to be less.
  • Scaling the effort of Agile becomes easier. In scaled approaches, it’s usual to see multiple teams operating at the same cadence. Even if an iteration is cancelled or abnormally terminated, recovery is possible by going back to the cadence.
  • As we saw earlier, with right cadence, the intensity of work remains even throughout a project.

More on the Topic of Cadence

As we reach closure of this article, I want to summarize the concept of Cadence used in flow- or iteration-based Agile with a video. It’s taken from ACP Live Lessons course. [Duration: 4m:26s]. This video uses a real-world example to explain the concepts I’ve written about above. For a better audio-visual experience, you may want to go full-screen with HD mode and plug-in your earphones.


Conclusion
The classical dance of Odissi starts with a solo form of pure-dance, where the performer emphasizes the execution aspect. It’s about knowledge, skills, dance patterns, and execution. The dancer, at this stage, excels with pure technical performance. In Agile methodology with daily cadence, the emphasis is also on execution–a bit of planning, a bit of design, a bit of development, a bit of testing, a bit of integration–daily. The individual developer is primarily involved in this technical work.

After the start, highlighting technical skills, we see the Odissi performer dancing with emotion, communicating feelings, and expressing nuance. Multiple dancers often come together at this point in the performance. In the context of Agile, within iteration (or flow) cadence, individuals come together to decide which items will be taken-up as they interact and communicate.

Next in the Odissi dance, it’s about group performance, or a team delivering together (i.e. they work on the whole drama part of the dance with a story). Similarly, in Agile, as the team comes together, delivery is made in release cadence. This can be after multiple iterations, every iteration, or on-demand. In most cases, these releases are given to the customer.

Finally, when pure-dance and dance with emotions combine with group-dance and delivery happens frequently, the Odissi dance becomes something else entirely. It is climatic, liberating, and often even stunning when this occurs. This stage is known as Mokshya in Odissi, meaning liberation or freedom.

In Agile parlance, this stage will be called a hyper-performing team, and it delivers highest-valued deliverables frequently, without interruptions. The team performs as a single, immutable unit, giving hyper-performances. While doing so, a constant pace can be maintained indefinitely. This is the essence of cadence.
 
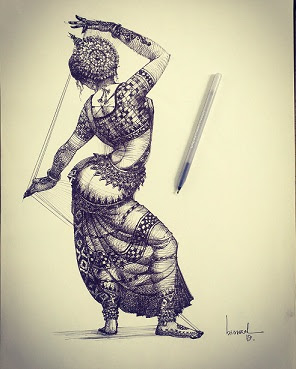
* The opening photo of Odissi dance is by Bijay Biswal, who graciously agreed to share his ball-pen painting for this article and informed to be an honor that his painting is featured in the article.


This article is dedicated to the memory of my father, the late Harendra Nath Dash, who passed away two years ago on June 11. He, along with my mother, introduced me to Odissi dance, taught me the importance of dance and music in our daily lives. It’s a tribute to them and their teachings. Men and women around the world have kept alive various forms of dance, which calms our minds and nourishes our souls. I take a bow.

--

This article was first published by MPUG.com on 29th June, 2021.

 
References:
[1] Online Course: PMI-ACP Live Lessons – Guaranteed Pass, by Satya Narayan Dash

[2] Online Course: PMI-ACP 21 Online Contact Hours, by Satya Narayan Dash

[3] Book: Kanban and Scrum, Making the most of both, by Henrik Kniberg and Mattias Skarin

[4] Book: I Want To Be An ACP, the Plain and Simple Way to be a PMI-ACP, 2nd Edition, by Satya Narayan Dash

[5] A Guide to Project Management Body of Knowledge (PMBOK), 7th edition, by Project Management Institute (PMI)


Thursday, July 28, 2022

Building A Sprint Backlog with All Scrum Events in MS Project Agile


One of the key artifacts in a Scrum Project is the Sprint Backlog, with others being the Product Backlog and (Product) Increment. The Sprint Backlog is prepared during the Sprint Planning event, and it’s used throughout the Sprint. The Sprint Backlog, not only takes the product backlog items from the top of the Product Backlog, but can also have individual tasks and other non-feature tasks associated with it.

This article was first published by MPUG.com. This is a refined version with some updated notes, tip and explanations. For in-depth understanding of MS Project Agile and certification on Hybrid-Agile, you can refer these courses:

Some project management practitioners think that the MS Project software is not a suitable tool for managing Scrum projects or Agile projects. However, it’s not the case. In fact, everything that you want to do in a Scrum project can be done with MS Project using its in-built Agile features.

In this article, we will explore how to create a Sprint Backlog, along with its content items such as features. I will demonstrate how to break down features into tasks. Towards the end of this article, I’ll demonstrate with a video using the MS Project 2019 Sprint feature available in MS Project Online Desktop Client.

The Product Backlog

The Product Backlog (PB) has all the features that you want to deliver over the life cycle of a product. A set of work items are taken from the PB for every Sprint, which in itself is a short project. Before the start of the Sprint Planning event, the PB is ordered with the highest priority items at the top. You can prioritize the backlog items with various prioritization schemes.

An example Product Backlog is shown below in the Sprint Planning Board view with a number of feature items to be delivered for a Stock Trading System. You can go to this view from Sprint Tools > Sprints tab > Views group. Select the Sprint Planning Board command from Planning drop down menu. 


Let’s look at the first three items for our upcoming Sprint, i.e. Sprint 1. As this PB is presented to the Scrum Team, the team decides to the take the top three items into the Sprint Backlog:

  • Feature- 1: Login to the online trading system
  • Feature- 2: Create a new user
  • Feature- 3: Edit an existing user

To do this in MS Project, we have to drag and drop from the “No Sprint” board column to the “Sprint 1” column. 


Dedicated Resources

In a Scrum Team, it’s a good practice to have team members who are 100% dedicated, including the Product Owner (PO) and the Scrum Master (SM). This results in less troublesome situations, the likes of which we have explored in a previous article, Lean-Agile Troubleshooting.

As the Scrum team decides what items are to be pulled into the upcoming Sprint, we need to have team members available. This is depicted below. 

As you may have noticed, the team consists of the developers, the PO, and the SM. I’ve grouped them accordingly, which will help in further filtering, grouping, highlighting, and generating reports in MS Project.

The Sprint Backlog (First Cut) *** UPDATED ***

As the team has decided on the feature items to be delivered for the upcoming Sprint -1, the first cut of our Sprint Backlog is ready. This can be seen in the Current Sprint Board view. You can go to this view from Sprint Tools > Sprints tab > Sprint group, and then select the Current Sprint Board command from Sprint drop down menu. 


Our Current Sprint Board is for Sprint 1 and is as shown below. In it, we have four workflow states: Not Started, Next up, In Progress, and Done. If you have other workflow states, you can simply rename it. 


I’ve renamed the “Not Started” workflow state as “Sprint Backlog,” to clearly indicate that the items in this state are the backlogged items for this Sprint.

The Scrum Events *** NEW ***

We will add the following Scrum events:

  • Sprint Planning – A task
  • Sprint Review – Also a task
  • Sprint Retrospective – Also a task
  • Daily Scrums – Recurring Tasks

The Scrum events are depicted in the below figure, taken from my latest book: I Want To Be An ACP

These events are in every Sprint, on which you can read more in these two articles:

 For a two-week Sprint, I’ve applied the following durations:

  • Sprint Planning = 4 hours (0.5 days)
  • Sprint Review = 2 hours (0.25 days)
  • Sprint Retrospective = 1.5 hours (0.25 days approx.)
  • Daily Scrum = 15 minutes

If you are having a four-week Sprint, have the corresponding durations.

Add the Scrum Events *** NEW ***

Now, we are going to add the Scrum events by switching to the Sprint Planning Sheet view. You can go to this view from Sprint Tools > Sprints tab > Views group. Select the Spring Planning Sheet command from the Planning drop down menu.

As shown below, I’ve added the Sprint Planning, Sprint Review, and Sprint Retrospectives as tasks in the Sprint Backlog. 


The “Board Status” column in the above view is now showing Sprint Backlog because we changed the workflow state (board column) name earlier. Also, remember to associate all the events with the current Sprint (Sprint 1).

Add the Daily Scrums

The slightly tricky part is the addition of the Daily Scrum events, which will be recurring. These can be added by going to the Task tab of the Ribbon and inserting a recurring task with the following entries: 

When you have this recurring task as part of the current Sprint Backlog, enter it just above the “Sprint Review” task. This is because this event happens after the Sprint Planning, but before the Sprint Review and Sprint Retrospective.

As you add the Daily Scrum events, the Current Sprint Sheet view will be populated with all the Daily Scrums for the current Sprint. 

As you can see above, there are a number of Daily Scrum meetings. The Task Summary Name column in the view has been populated as “Daily Scrum.” This is how the Sprint Planning Sheet view is designed.

However, when you save this Sprint Planning Sheet view, then the Summary Task name of “Daily Scrum” will NOT be available! This confuses many, but it happens because this view of the Sprint Planning Sheet filters out the Summary Tasks and puts them under the Task Summary Name column.

Breakdown the Features into Tasks

One can continue planning in this Sprint Planning Sheet view. After all the name of the view itself tells this is the view in which you will plan for the Sprints.

However, we will switch to the Gantt Chart view (or Task Sheet view) to add the tasks under the three features we have selected.  This shows you another way and also shows the tasks under the features as indented. In our case, all the three features taken for Sprint 1 will be Summary Tasks.

In the below Gantt Chart view, I’ve added two more columns, Sprint Start and Sprint Finish, which will help us to plan for the current Sprint. 

As shown, the current Sprint now has the three features: all the Scrum events for this Sprint along with the Daily Scrum (as a summary task) and the duration assigned to the Daily Scrum meetings.

Next, from this view, we are going to break-down the features into tasks and assign the possible duration along with the Start and End dates for all the tasks.

This work also happens during the Sprint Planning event, as team members decide who will do what tasks. Remember, the Scrum team is self-organizing and self-managing.

For all the Summary Tasks (three features), we ’ll have these sub-tasks:

  • Design and develop
  • Implement UI
  • Prepare test plans
  • Execute test plans
  • PO review

You can change the above task names as the team members discuss and break-down into tasks during the Sprint Planning meeting.

To add the tasks, you just have to right-click and insert the sub-tasks. Indent the tasks added to make the features display as Summary Tasks. Unlike the Sprint Planning Sheet view, in this view the Summary Tasks won’t be filtered out. This results in the following figure: 

Now, we are going to look at the durations, as well as apply the resources to these tasks. In Agile projects, the Scrum Master (SM) doesn’t assign the tasks to team members. Rather, the team members decide who does what.

The job of the SM or Agile Project Manager (APM) is to facilitate and build the Sprint Plan (Sprint Backlog in MS Project) by taking the information from the team members and/or from a white board discussion meeting. After applying the resources, we will have the following view: 

At this stage, it’s important to make the following notes for this Scrum project:

  • The three features for our Sprint 1 are taken as Summary Tasks.
  • Each feature has been broken down into multiple (sub)tasks.
  • All four Scrum events are included as part of the plan with respective durations (we have seen before).

In addition, the planned duration, as well as the planned start and end dates, are there for all tasks under the feature items.

Resolve Overallocations

It’s possible that while applying the resources, there will be some overallocations. It’s natural, and the MS Project tool provides a large number of options to resolve overallocation. For example, in the above figure for this Scrum Project, we have overallocation notifications for Task ID – 1 (Sprint Planning) and Task ID – 3 (Design and Develop).

You can easily see and resolve the overallocations by splitting the view and bringing the Resource Graph view into the bottom pane

This clearly shows the concerned team member (Eric S) is working 4 hours extra on the first day of the Sprint. You can also see the overallocation in the Resource Graph indicated by a red vertical bar. This matches with the horizontal bar in the Gantt Chart view above.

Because of the overlap between the Sprint Planning event and the task of Design and Develop, you can resolve this overallocation by adding a Finish to Start (FS) dependency between Task ID 1 and Task ID 3. The predecessor field is available by default in the Gantt Chart view above.

This dependency is logical because, only after the Sprint Planning is over, can the team members start working on the task items.

The Sprint Backlog (Final Cut)

Now we will go for the final cut of the Sprint Backlog and give ourselves finishing touches as needed.

For this purpose, I’ll first go to the Current Sprint Sheet view. You can go to this view from Sprint Tools > Sprints tab > Views group. Select the Current Sprint View command from Sprint drop down menu. 

Like in the Sprint Planning Sheet view, the Current Sprint Sheet view does not show the Summary Tasks with their sub-tasks indented. Rather, the Summary Tasks (features, in our case) are moved into the Task Summary Name column in the Current Sprint Sheet view. This is highlighted above.

If you want to see it along with grouping under the Task Summary Name, simply create a new custom group and apply this grouping to visualize. It’s depicted below. 

The Scrum events such as Sprint Planning, Sprint Review, and Sprint Retrospective are non-Summary tasks, whereas we have other groupings with respect to the Summary Tasks (features), such as “Create a new user” or “Edit an existing user.” These features have tasks under them.

Key Points – Working with A Scrum Project

Now let’s have a demonstration of the Sprint Backlog that we have created and review a few key points. They are explained in the video [duration: 7m 01s], which I’ve prepared in support of this article. The content of this has been taken from my new course, Mastering MS Project 2019 Agile. For the best experience, you may want to go full-screen in HD mode and plug-in your earphones.


These key points are important for any MS Project Agile practitioner, especially if you are moving from a traditional development mode to Agile.

Conclusion

Now our Sprint Backlog is ready, and the APM or SM can easily track easily the current Sprint Backlog, i.e., Current Sprint Board view in MS Project, as shown below: 


In the above figure, I’ve customized the cards to include fields such as Task ID, Task Summary Name, Start Date, and Work. The customization command in MS Project is highlighted.

As you proceed with your Sprint, drag and drop the cards across the Board columns. If the work item is complete (i.e. dragged to Done), a tick mark will appear on the top right part of the card. In the above case, the Sprint Planning work is done and you have a tick mark for this work item. This is also explained in the above video.

I hope this article provides you with an in-depth understanding on how to prepare and proceed with a Sprint Backlog, one of the most important artifacts used in a Sprint.

Go on and start sprinting without any obstacles with MS Project!


References:

[1] NEW Online Course: Mastering MS Project 2019 Agile (Scrum and Kanban), by Satya Narayan Dash

[2] NEW Online Course: Certified Hybrid-Agile Master with MS Project (Agile), by Satya Narayan Dash

[3] Online Course: MS Project Live Lessons, by Satya Narayan Dash


Thursday, July 14, 2022

PMI-RMP Latest Exam from 2022 – Top 11 Changes to Know


As informed with multiple posts in this site, the Risk Management Professional Exam (RMP) exam has changed this year (2022). The change happened a couple of months before. This is primarily due to the introduction of the new ECO, new standards and guides and other references.

It's also worth noting that the new RMP ECO will be valid for the next three to five years.

As noted in earlier posts, the NEW RMP exam related content has been reflected in all of the followings:


You can read the above posts to know about the changes with respect to the respective courses and book.


Now, at a high-level, the following are the top changes considering the entire RMP exam.


Top 11 Changes – New PMI-RMP Exam


Change – 1: Introduction of a NEW ECO

The new ECO comes with a new set of domains. The domains are:

  • Domain I: Risk Strategy and Planning

  • Domain II: Risk Identification

  • Domain III: Risk Analysis

  • Domain IV: Risk Response

  • Domain V: Monitor and Close Risks

The ECO sets the blueprint of the exam and informs the percentage of questions coming from each domain.

However, to understand the ECO, you need to study it thoroughly with all the tasks and enablers. Every domain has a number of tasks and every task has a number of enablers. You need to understand them to know what kind of questions are expected in the RMP exam.


Change – 2: Introduction of NEW Exam Pattern

The exam pattern is now changed. Earlier the RMP exam had 170 questions. Now, the RMP exam will have:

  • 115 Questions (mostly situational questions).  

  • 100 Questions will be scored.

  • 15 Questions will be unscored.


Change – 3: Change in Exam Duration

This is actually part of the Change – 2, but considering the drastic reduction in questions and duration, the exam is actually less physically demanding. Earlier it was 3.5 hours (210 minutes) for 170 questions, which translate to 74 seconds for every question.

Now:

  • The exam duration is of 2.5 hours (or 150 minutes).

  • For every question, you will get more time (78 seconds approx.).

With 78 seconds for every question, the new exam is actually giving you more time to answer the questions compared to the previous exam. Hence, you have a better chance to score.


Change – 4: Introduction of the Foundational Standard for Risk Management in Portfolios, Programs and Projects.

The Standard for Risk Management in Portfolios, Programs and Projects was released in 2019, but was not explicitly listed for the RMP exam. Now it’s listed as one of the references. This is also called the Foundational Standard for Risk Management in my book and courses.

In fact, this standard is the first in the list of references and in my view, it’s the MAIN source of reference.


Change – 5: Introduction of NEW PMBOK Guide, 7th edition.

The PMBOK7 is now a reference source for preparing the RMP Exam. The latest edition of the PMBOK guide was released in 2021 and listed as the second reference. This edition comes with 12 new project management principles (includes a dedicated risk principle), 8 performance domains and a large number of models, methods and artifacts (MMAs). It also has tailoring considerations. 

For the RMP exam, of course the main focus will be Risk Management and how to understand and apply Risk Management in the context of this new guide.


Change – 6: PMBOK Guide, 6th edition, what happens to it?

This is a very important aspect as the PMBOK Guide, 6th edition is not listed as one of RMP exam references! However, it will still be a reference, primarily for two reasons:

  • The first reference source for the new RMP Exam is the (Foundational) Standard for Risk Management in Portfolios, Programs and Projects. It directly and explicitly refers to the PMBOK Guide 6th edition. The reference is quite detailed considering the 5 process groups (PG), 10 knowledge areas (KA).
    In the Foundational Standard for Risk Management, there is also a dedicated mapping table to the 49 processes of PMBOK6 across the PGs and KAs. 

  • There are seven processes for Risk Management Framework in the Foundational Risk Management Standard - the main reference source. And exactly seven of those risk management processes are elaborated in the PMBOK6, with details on the inputs, tools and techniques and outputs.

The link between the Foundational Standard for Risk Management and the PMBOK guide 6th edition is so strong that you can’t read the foundational standard properly at all, without understanding what PMBOK6 contains!

Hence, in my view, though not listed as a reference, the PMBOK Guide 6th edition is a must-read for your new RMP Exam. However, your reading should be specific to Risk Management and generic to a few other important knowledge areas.


Change – 7: Practice Standard for Project Risk Management, what happens to it?

It’ll still be a reference, though not explicitly listed! Do note that this standard is specifically for projects and hence, directly applies to the RMP exam, though not listed. You have a large amount of information available in this guide, which is not available in either of the PMBOK guides or the Foundational Standard.

However, this guide has outdated processes such as Control Risks, and also other outdated concepts. These have to be changed as you refer to any preparatory course or material.

My suggestion would be that you browse through this guide quickly to have mastery over your preparation. This guide noted a number of import items for the processes of Risk Management such as:

  • Critical Success Factors are clearly explained, not just bullet line items!

  • A number of risk related terms such as Risk Meta Language, Non-Risk items are explained.

  • Informs how to document the artifacts and communicate which form a large part of the ECO

  • A number of tools and techniques with advantages, disadvantages are noted.

  • Change request management for risk response actions such as conditional and unconditional ones are clearly noted. These are not available anywhere.


Change – 8: Online Proctored Testing now available for the RMP Exam.

The new RMP exam is now offered in the online proctored mode, like other exams such as Project Management Professional (PMP), Certified Associate in Project Management (CAPM), Agile Certified Practitioners (ACP) etc.

This is a good change and may help a number of exam takers. Do note that you are allowed one break in the new RMP exam for the online proctored mode.

Change – 9: Introduction of Agile (and Hybrid) for all the Domains.

Now you have to know the Agile concepts in Risk Management. There are a large number of Agile concepts to be used in Risk Management. Many are not aware of this. The ECO informs that Agile concepts will permeate throughout the domains of risk management.


Change – 10: Introduction of other new areas such as Servant Leadership, Governance, Enterprise Risk Management.

These new areas you need to know as well. These are informed in the new ECO. Servant Leadership has overlapping areas with Agile Management. 


Change – 11: NEW questions styles in the exam.

Earlier the exam had only multi-choice questions, i.e., out of multiple choices, only one choice will be correct.

Now the exam also has multi-response questions, i.e., out of many choices, more than one choice will be correct. 

---

That’s it! The above top 11 changes are the most important ones that you need to know. 

When you prepare for your RMP exam, keep these new changes in mind. It'll help you better prepare for the exam. The ECO has nuances, which is only understandable with the right material and content. Otherwise, you may find it to be confusing. In addition, I’ve noted the other new references.

Also, there are additional suggested books (not published by PMI), which you have to read for your exam. 

The fully updated book of I Want To Be A RMP, the fully updated courses of RMP Live Lessons – Guaranteed Pass and RMP 30 Contact Hours Online have all the needed changes to prepare and enable you for the RMP exam.


RMP Live Lessons - Guaranteed Pass:

RMP 30 Contact Hours Course:

RMP 30 Contact Hours Vs. RMP Live Lessons
Book for RMP Exam: