Thursday, March 31, 2022

Enterprise Risk Management (ERM) and Risk Governance


Let’s consider the following scenario based true events which occurred within an organization I worked closely with recently. This company had a long-running project with a number of uncertainties. Risks were identified, then qualified, and risk responses planned. For implementation of these risk responses, a number of actions were needed. Some were taken, but most ignored or overlooked because of other projects and lack of understanding of risk management at an organizational level.

I came to know that there were no consistencies within risk governance parameters, such as risk appetite, or risk threshold, for example. In fact, there was no structured and uniform way to define the probability and impact scales, no standard form of risk reporting, and little to no accountability for addressing risks. Hence, when risks were reported, team members didn’t understand, or if they did, they wouldn’t know how or whether to act.

What happened?

As you may have correctly guessed, this project was in trouble. And, despite, it continued to run for a long time! It was a classic watermelon project, where everything looks green from the outside, but is all red when you open it.

In this article, we will explore how to manage such massive gap at an organizational level considering Enterprise Risk Management and Risk Governance. If you are preparing for the Risk Management Profession (RMP) examination, you need to be aware of both these concepts. In fact, in a recent RMP Success Story, a senior program management professional emphasized it.

What is Enterprise Risk Management?

Projects can exist independently, but usually they exist within a program or a portfolio, which in turn are held within an enterprise or organization. In most cases, such is the case for a program or portfolio. Hence when we talk of risk management, we also need to know how risk management happens in the context of enterprise: It has been found that organizations require risk management practitioners to use the risk management practices in project, program, and portfolio management, which are an integral part of the ERM framework.

In other words, ERM addresses risks at an enterprise or organizational level. ERM also addresses all the risks associated with an enterprise’s portfolios, which internally contains all programs and projects. A “Risk Governance Framework” for an organization is set at the enterprise level. There is a governance board which oversees the ERM and its framework.

On the other hand, portfolio risk management derives its policies, processes, methods etc. from the ERM framework, and program risk management, as well as project risk management, adopt their risk management practices from the portfolio risk management umbrella.

Why Go for Enterprise Risk Management?

Enterprise risks are also known as the business risks, and organization leaders must manage these to stay relevant and stay in the business. Typically, an organization runs many individual departments such as Development and Delivery (or Production and Distribution), Finance, Human Resources, Sales and Marketing, Legal and Compliance, among others.

All these functional departments may have their own risk management as shown in the below figure.

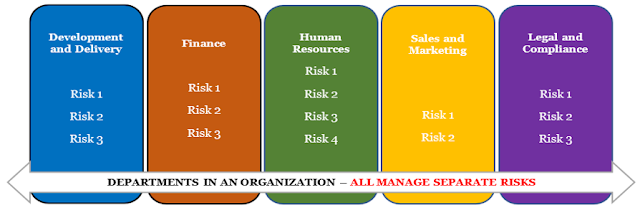
If the risks arising within these departments are managed individually, without a holistic or overall view of the risks from the organization’s perspective, the result is siloed risk management.

PPP Approach to ERM

Alternatively, organizations can take a common approach to risk management across the organization or enterprise, considering all the departments. In a projectized organization, ERM will consider all layers of management – project, program, and portfolio (PPP).

Portfolios of programs, projects, and operations are created to achieve strategic goals and objectives. In other words, portfolios are created to achieve an organization’s strategic goals and objectives. A portfolio internally contains programs and projects.

Considering PPP based management approach, the following should be noted about ERM:

  • Enterprise risk functions and management are performed by the Executive Management.
  • The ERM process is also determined by the Executive Management.
  • Best suited to handle ERM, the Executive Management is accountable for strategic goals and objectives.

Based on this understanding, we follow the below figure:

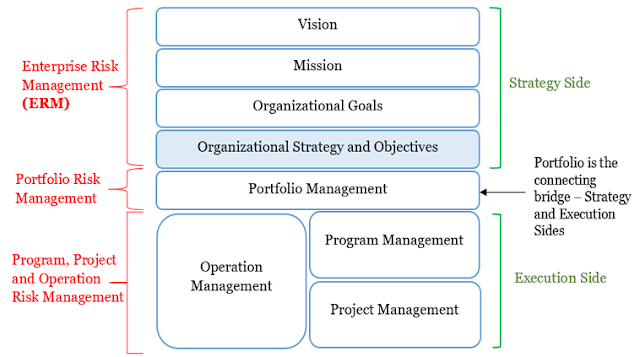
As shown, ERM supports an organization’s vision, mission, goals, and strategies. In fact, this support is the main objective of the ERM.

ERM Considerations for PPP Based Risk Management

ERM ensures that all organizational risks are properly identified, addressed, managed, and monitored. However, for the best application of ERM, a common approach to risk management is needed. This is because ERM should be considering all of the organization’s risks as an interrelated collection.

A common approach to risk management enables two things:

  • Normalization: The risk prioritization schemes, risk probability, and impact scales for the risks are standardized across the board.
  • Aggregation: Aggregation results in a combination of a number of risks coming from the portfolios of programs and projects.

With normalization and aggregation, one can state the risk at any level in the organization, making it understandable to everyone. There can be bi-directional movement and management of risks, or a cascading of risks from a higher level to PPP level or escalation from the lower level to the enterprise level.

Hence, modifying our previous figure with respect to layers of risk management, we can consolidate and present as the below figure.

This bidirectional movement of risks, results in integration, as well as alignment of ERM and PPP risk management.

Governance and Its Elements

Governance, as the name indicates, is the way to govern an “entity.” The purpose of governance is to ensure that the “entity” is managed in a proper way.

Governance can exist at the level of enterprise/organization, portfolios, programs, or projects. In such cases, they will be known as respective governance or governance framework. The governance framework is part of governance.

The major elements of an entity’s governance are these:

  • The Governing Body is a temporary or permanent group of members with responsibility and authority. This body provides the needed guidance and decision-making for portfolios, programs, and projects. An example is an executive board.
  • The Governance Framework contains governing domains with functions, processes, and activities for projects, programs, and portfolios. Examples of domains are governance communications, governance performance, among others.
  • The Governance Domain refers to a group of functions carried out by an individual, group, or organization to address a specific area of concern.
    For example, the governance communications domain is about dissemination of information.
  • Governance Functions are a group of related processes executed/performed to support the governance of portfolios, programs, and projects.

The elements and interactions among the elements of governance are shown in the below figure.


Types of Governance

There can be various types of governance such as organizational governance, portfolio governance, program governance, etc. at the respective levels.

Organizational governance is a structured way to provide governance at the organizational level. The focus is to meet organizational strategic and operational goals.

Portfolio, program, or project governance refers to the framework, functions, and processes that guide portfolio, program, or project management activities, respectively.

Governance Vs. Management

At this point, you may be wondering:

  • What are the differences between governance and management?
  • Does not the portfolio, program, and project management exist to guide the respective management activities? If so, why is governance needed?

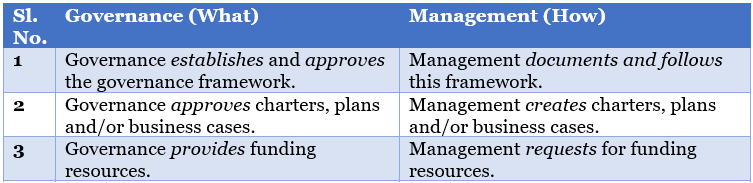
Yes, portfolio, program, and project management will still exist, but when it comes to governance there are some key distinctions, which can be summarized by this line.

Governance informs the “what” aspects. Management, the “how” aspect. The “what” aspects are about decisions, guidance, and ensuring PPP management. The “how” aspects are about organizing and doing the work.

Beyond the above key difference, I’ve noted some more differences between governance and management in the below table.


Risk Governance

With this background in mind, let’s now consider risk governance and the risk governance framework.

Risk management in the enterprise context is primarily about enterprise risk management (ERM), and it involves an integrated view of portfolio, program, and project management.

In this organizational context of risk management, these are the key points related to risk governance:

  • Risk governance is created, and the risk governance framework is also elaborated. Remember that the governance framework is an element of governance.
  • Within this framework, risks are identified at each level, i.e., the enterprise/organizational level or PPP.
  • Identified risks are analyzed—both qualitatively and quantitatively. Then, the best suitable governance layer is decided. It can be the portfolio governance layer, program governance layer, or project’s governance.
  • It’s possible that at each level of PPP governance, one can have a risk governance model, which is part of the corresponding P’s governance. For example, within the project governance, one can have project risk governance.
  • The respective governance layer decides on the escalated risks and what to do with them. Enterprise risks can be cascaded down to the respective suitable layer, if they can be managed at that level. As we have seen earlier, there can be bi-directional movement of risks in an organization.
  • Risk governance, at the chosen layer, guides in identification and assignment of risk owners. Next, it’s responsibility of risk owner to delegate risk actions to respective risk action owners.
  • Risk governance, at the chosen layer, guides on risk response strategies and risk response actions, which are associated with the response strategies.
  • Risk governance, at the chosen layer, also decides on the continuance or termination of a portfolio, program, or project.

Video – Risk Governance Vs. Risk Management  

Now, let’s look at the differences between Risk Governance and Risk Management.

For this purpose, I’ve put together a video [duration – 8m:36s], with additional explanations. For a better audio-visual experience, you may want to go full-screen with HD mode and plug-in your earphones. It’s one of many, from my RMP Live Lessons.


Conclusion

Let’s revisit the scenario explained at the beginning of this article, where a project had been running without any proper risk management. If you’ve watched the aforementioned video, you should be able to answer the following questions:

  • How did the ‘watermelon’ project exist?
  • Why was it running for a such a long time with little or no risk management?
  • How come no one was held accountable for it?

More importantly, I hope you have realized the importance of both Enterprise Risk Management and Risk Governance. I welcome your feedback below in the comments section.


--

This article was first published by MPUG.com on 27th April, 2021.


References:

[1] Online Course: RMP Live Lessons – Guaranteed Pass, by Satya Narayan Dash

[2] Online Course: RMP 30 Contact Hours, by Satya Narayan Dash

[3] Book: I Want To Be A RMP, The Plain and Simple Way To Be A PMI-RMP, Second Edition, by Satya Narayan Dash

[4] The Standard for Risk Management in Portfolios, Programs and Projects, First Edition, by Project Management Institute (PMI)


Monday, March 21, 2022

The Big Picture with Story Map in Agile Development


“I keep six honest serving-men,

They taught me all I knew,

Their names are What and Why and When,

And How and Where and Who.

I send them over land and sea,

I send them east and west,

But after they have worked for me,

I give them all a rest.”

– From the poem, “The Elephant’s Child,” by Rudyard Kipling

Long ago, in my childhood days, I was introduced to the fascinating world of poetry by my father, who brought a variety of poems and stories from writers and authors around the world to me. “The Elephant’s Child” was one of them.

This poem in particular has been used as a method. That is, the Kipling method. One of communication management, risk identification, charter preparation, and also, product development. With this method, one gets various ideas considering multiple aspects: What, Why, When, Where, Who, and How. It’s also known as the 5W1H method. In this article, we will learn about a technique called Story Mapping, where this method can be employed as an initiation point.

With the 5W1H method, when starting product development or creating a service or solution, one asks questions such as the following:

  • What needs to be built?
  • Why are we building it?
  • For whom are we building?
  • When will it be needed?
  • Where does this fit in?
  • How are the customers going to use it?

Jeff Patton, the creator of the User Story Mapping technique, explains the building of the map in six simple steps. They are:

  • Frame the idea or problem
  • Map the big picture
  • Explore
  • Slice out a release strategy
  • Slice out a learning strategy
  • Slice out a development strategy

The above 5W1H questions address the initial steps. It is important to remember that these questions get the conversations rolling. Shared conversations and shared understanding can then occur, as those aspects are what stories are mainly about.

Story Map Definition

As you may have noticed, this article is about Story Mapping, not User Story Mapping. There can be varieties of stories: spike stories, analysis stories, risk stories, and architectural stories, among others. I’ve seen all such stories being part of the map, and hence, will be using the term, Story Map.

Let’s begin with the definition of a story map.

Story map is a grid-like graphical representation of epics and stories in a sequenced order based on their business value and the order in which the stakeholders will execute them. When read from left-to-right of the map, it tells a big story in a sequence of steps, whereas when read from top-to-bottom, it gives more details about each step.

After you have framed the idea or problem with the 5W1H questions, you can begin to build a story map at a very high level with the help of above definition.

The customer, user, or subject matter expert may tell the story of the product being built in a sequence of steps. Each step is written on a sticky note, index card, or electronic card horizontally (from left to right). Then, under each step, the details are written on another set of cards, and this time, placed vertically from top to bottom. This forms a grid-like structure as shown below. This is a story map.

In his book, Jeff Patton calls the steps from left to right, “Activities”. Under each activity, you have a set of “tasks”, which you get when you break-down or decompose the activities.

As shown, the story is told by a user from left-to-right in a sequence of steps—each step being an activity. This sets the narrative flow. Under each activity, we have a set of tasks decomposed from the respective activity, and they are placed vertically from top-to-bottom.

With this basic understanding, let’s go a bit deeper and understand the various components of a Story Map.

Going forward, I’ll be using terms such as Epics (in place of Activities) and Stories (in place of Tasks), to maintain consistency with an earlier article on Agile development. In the real world, it doesn’t matter which terminologies you use, if you understand the concept and can apply it while building your product or solution. 

Building Blocks in a Story Map

Personas

The story telling for a story map starts with the persona. Persona is usually taken for a user, but in this case, I’ve extended it to stakeholders. The persona is an imaginary representation of the stakeholder role used while describing a story. You may express this element as the needs of an imaginary stakeholder. The persona can have likes, dislikes, a job, and goals, among other aspects. A persona plays a role in the organization—the role is real, but the persona is not.

The epics are considered from the persona’s perspective. For example, the story explains how the stakeholder is going to use the product or solution. Comparing a story map to a human being, you can say the persona will act as the head of the story map. The first thinking part starts here.

For story mapping, there can be many personas – not just one. This is similar to a human being who grows with input from many. When working with personas, a variety of stakeholders in various roles should be considered, who will interact with the product being built.

Backbone

Without a spine, a human can’t function, and similarly, without a backbone, a story map can’t function. The backbone provides the minimum set of capabilities needed to deliver the product or solution or service. This can also be called the minimum viable product (MVP). The backbone usually consists of features and epics.

Walking Skeleton

Just below the backbone, we have the map’s body part. The body consists of the walking skeleton. Again, making a comparison to the human body, you can say the walking skeleton is the story map’s skeleton, too. Just like the human body’s skeleton, without the walking skeleton, the product would be non-functional.

The walking skeleton is the complete set of end-to-end functionalities that make the product or solution acceptable. This part of the story map’s body usually consists of stories, including the user stories. This set of stories make the product minimally functional, and hence, can be called the minimum marketable features (MMF).

Under each story of the walking skeleton, you can have more stories arranged vertically. Higher priority stories will be at the top, whereas lower priority ones will be at the bottom.

When you combine the personas, the backbone, the walking skeleton, and the additional stories below the walking skeleton, you get the Story Map, as represented in the below figure.

The stakeholder starts telling the big story in a sequence of steps, which are represented as epics. This constitutes the backbone. While building the backbone, the principle of “mile wide, inch deep” or “kilometer wide, centimeter deep”, as Jeff beautifully puts it, is followed. It means we get to the end of the big story, before diving deep into the details.

The walking skeleton is below the backbone. When you decompose the epics in the backbone, you get the stories in the skeleton—ones that make the product minimally functional. Below the walking skeleton you have more stories, which are ordered.

Release Planning with a Story Map

After you have placed the epics, stories, and features in the story map based on the team’s capacity to deliver, releases can be determined. This is where the release strategy is sliced out from the story map.

As we already know, the backbone includes all the absolute essential parts of the product. These are items that you just can’t prioritize because they have to be in the product. Next to the backbone, we have the walking skeleton, which has the minimum marketable set of features. Hence, our first slice for the release consists of these two, and possibly some more stories, below. In the next slice (for another release), we can take more stories and create another release, and so on. This is shown in the figure. 

As you can see, in the first release we have the backbone and stories from the walking skeleton, along with one story below the backbone. In our second release, we have more stories taken, which are from below the backbone. Remember that these stories are ordered based on their business value.

Story Map vs Product Backlog

At this stage, you may be wondering why one should go for a Story Map rather than a Product Backlog?

After all, the product backlog also has all the epics, features, and stories in a single file. It can also have release slices. There are quite a few differences between the two, but I’ll note the most significant ones:

  • While working with the product backlog, it’s easy to get lost in the details. Team members will be working on tasks, but they don’t see the big picture. You can literally miss the forest for the trees! With a story map, all members of the team see the big picture. This, in my view, is the most significant benefit of a story map over a product backlog.
  • The story map is a two-dimensional visual structure, whereas the product backlog is a one-dimensional flat structure. Story mapping, on its own is also a prioritization technique—it’s just that it is done in a visual way.
  • Dependencies can’t be easily shown in a product backlog as long as it’s a flat one, whereas dependencies can be represented visually and more clearly with a story map.

So, which should one use?

Note: You can learn the various differences between Story Map and Product Backlog in the below detailed post.

Agile Asanas: Story Map Vs. Product Backlog - The Differences 

The primary idea behind telling stories is communication. As noted earlier, it’s about shared conversations and shared understanding. You may think of using both the story map and product backlog in a single map, which is shown in the below figure.


The product backlog is just below the story map with a set of index cards or sticky notes, which are the backlog items. When needed, you can pull the prioritized ones into the story map. Don’t just go by the lumped-up cards in the backlog. Remember, you can order them as well.

It’s up to you as the Product Manager or Product Owner in consultation with your Project Manager and team members to decide which one best works for the team.

At this stage, it’s pertinent to note that like a Product Backlog which is never complete, a Story Map is also never complete. When new feature requests come up or enhancement requests are made, you can add, arrange, and order them within the story map.

A Practical Story Map

Let’s look at a real-world example to understand story mapping further. I’ll use my previous example of a flight ticket reservation portal, where I had explained various types of stories.

We will first start with the possible stakeholders (personas) who will be using this portal:

  • Normal Traveler
  • Business traveler
  • Frequent Flier
  • Booking Agent
  • Vacation Traveler
  • … you can add more.

You need not work on all of them, but can take just one to build the MVP consisting of the backbone and walking skeleton. For our example, let’s take the “Business Traveler.”

Considering the business traveler, we need to determine the big story in a sequence of steps. These steps will form the backbone or set of epics. These epics, when broken down, will provide the stories, which are listed next to them.

The epics are noted in the below table. Can you think of the associated possible stories?

Go ahead and try it.

The associated stories for the epics are noted in the below table. Your answer may vary, but you’re right if you tried to break-down and get to the related stories.


The above stories can be put in the usual story format. For example, you can say: “As a business traveler, I want to register via e-mail, so that I can sign-up for the portal.”

I’ve also noted the epics in the above table in single words. Search for a flight is simplified to “SEARCH,” select a flight becomes “SELECT,” and so on. This is for simplicity and to keep our high-level goals focused. When we take these epics and put them as a sequence of steps for the business traveler, we will get the following figure.

As shown, the story of a business traveler using the portal listed horizontally in a sequence of steps. The traveler will first sign-up, then search for a flight, and then select the flight. The traveler will pay for the tickets, and finally, close-out his/her interaction with the portal. These steps form our backbone.

Next, we will take the first big activity or epic, “SIGN-UP,” and arrange the stories associated with it vertically, as shown below. If you created your own stories, go ahead and put them below the respective epics within the structure of the backbone. This results in the walking skeleton and more stories below it.

Next, we slice out the releases from the map.

  • For the backbone, we will have SIGN-UP, SEARCH, SELECT, PAY, and CLOSE.
  • For the walking skeleton, we will have “new user registration” and “log-in” from “Sign-up,” “search by journey start/end dates” from “Search,” “Choose by shortest flight duration” from “Select,” “pay via credit card” from “Pay,” and “logout” from “Close.”

Your first release slice may look differently depending on the epics and stories you have chosen to start with. If your team has the capacity, take more. If this is the case, when you slice out the first release, it will result as shown below.


For subsequent releases, you and your team can decide which other stories are to be taken up.

That’s it! If you have understood so far and are able to slice out your first few releases in the map, you have understood the concept of story mapping well. It’s a long-read. But, I believe, if you have read it, worked on it, and gone through it honestly, it’s time to take a rest, as the poem I opened with says.

If you have comments, new views, or suggestions, do share them below.

This article is dedicated to the memory of my father, the late Harendra Nath Dash, who passed away last year on June 11. I miss him every day and feel his absence. He first introduced me to the world of poetry, stories, and books, so this is a tribute to him and his teachings.

--

This article was first published by MPUG.com on 23rd June, 2020. 


References:

[1] User Story Mapping – Discover the Whole Story, Build the Right Product, by Jeff Patton with Peter Economy

[2] I Want To Be An ACP: The Plain and Simple Way To Be A PMI-ACP, 2nd Edition, by Satya Narayan Dash

[3] The PMI Guide to Business Analysis, by Project Management Institute (PMI)


Monday, March 14, 2022

Up and Running MS Project and JIRA with a Bridge


Imagine the following situation:

You’re working on a large-scale system integration project using MS Project as the project management tool, but a component team for this project has been using Jira for legacy reasons. You want to have your overall project plan, including this component team’s work, in MS Project, though the component team will continue to work with Jira. How would you manage such a collaborative effort?

And, another scenario:

Your team has been using Jira for a development project. The business executive team wants to see a Gantt chart with critical paths shown along with dependencies. They like MS Project reports and want such generated. What would you do?

In both of these situations, you’d have to make MS Project and Atlassian Jira work together, and to do that, you need a connector or a bridge. For the sake of illustration, I’ll be using Ceptah Bridge, which allows us to connect MS Project and Jira.

The versions used here for the respective software are:

  • Microsoft Project 2016
  • Atlassian Jira 8.1
  • Ceptah Bridge 3.8.5

Installing Ceptah Bridge as a MS Project Add-in

To install Ceptah Bridge, you can download the windows installer from Ceptah Solutions. Post installation, it will be shown as one of the add-ins in MS Project. 

As shown above, there are a number of menus in this add-in, which perform various functionalities such as connection check, synchronization, import etc. Briefly, they perform these functionalities:

  • Synchronization: Here we synchronize the tasks of MS Project with issues in Jira, or create linked issues in Jira corresponding tasks in MS Project.
  • Import: Used to import existing issues in Jira and create tasks in MS Project. You can also import users from Jira to MS Project.
  • Close: Close the issues in Jira and update accordingly in MS Project.
  • Settings: Used to set various fields in both MS Project and Jira. It has various mapping functionalities, which support both predictive and adaptive modes. For agile mode, Scrum is used with sprints, epics, and stories.

In this article, we will cover functionalities related to synchronization and updates showing necessary settings. Note: we will be using predictive mode. 

Checking MS Project and Jira Connectivity

Post installation of Ceptah Bridge, you should first ensure the connectivity between MS Project and Jira. This can be checked by navigating in Captah  to the “JIRA Connection Settings” command dialog box, as shown below. 

I’ve used a web log-in authentication method and the site URL created in Jira for this purpose (https://msproject-jira.atlassian.net), You can also use an installed Jira server, for which the URL would be as follows:

<localhost>:8080

For the step-by-step installation of Jira server, you can refer this guide. The steps remain almost same for Jira server 8.1.

With a correct username and password, when you click on the “Test Connection” button, a successful string message, “The connection is working,” will be shown. Successful connection is important before we proceed with other work such as synchronization. 

Setting-up a Project in MS Project

For the sake of example, I’ve created a project plan named “Sample Business Plan.mpp,” which is shown below: 

In addition to the usual fields, I’ve added two custom text fields, (“Components” and “Fix Versions”), which will be used while mapping with Jira via Ceptah. There are two versions (“1.0” and “2.0”) and two components (“Component A” and “Component B”). Note that if we hadn’t added these custom fields, mappings could have been done from right within Ceptah, which in turn creates these fields in the project plan’s view.

Setting-up a Project in Jira

You have to set up a Jira project before doing any synchronization. As shown below, a project called “Sample Business Plan” has been created with project key “SBP.” 


Note, there are no issues in this project at this stage. There are three workflow states in the project board (“TO DO,” “IN PROGRESS,” and “DONE”), with no work-in-progress items. During synchronization, tasks from our MS project plan will be mapped and shown as issues in Jira project.

Ensuring Correct Project Synchronization Settings

After installing the Ceptah Bridge, checking connectivity, and setting up projects in MS Project and Jira, our next step is to ensure proper setting for the bridge. This can be done from within the “Project Synchronization Settings” dialog box, which is opened using the Ceptah add-in “JIRA Project Settings” command.


The above synchronization settings correspond with the MS Project “Sample Business Plan.mpp.” There are many tabs in this dialog box such as Basic, Status, Secondary, etc., with which you can do mapping between MS Project and Jira. The arrow mark in the above screen indicates the direction in which the data is copied. For example:

  • The “Issue Key” field in Jira is mapped to “Text10” field in MS Project.
  • The “Issue Type” field in Jira is mapped to “Text1” field in MS Project.
  • The “Finish” field in MS Project is mapped to “Due date” field in Jira.

One key point to note is this: the “project” field in Jira must correctly map to “Project Key” or “Project Name” on MS Project side. In our case, the project key used is “SBP.”

Performing Various Operations

After ensuring proper mappings, we now can perform synchronization between MS Project and Jira.

1. Create

First, let’s see how the tasks in MS Project are created as issues in Jira. As we are creating issues in our Jira project for the first time, we will use the Ceptah add-in “JIRA Synchronize” command. This launches the “Synchronise with JIRA – Sample Business Plan.mpp” screen, which is shown below.


The action listed in the “Action” field is “Create Issue.” We can be sure that each task in MS Project will now be created as an issue in Jira. For example:

  • “Define business vision” is a task in the MS Project plan with Task ID 3.
  • This task will be created as an issue in Jira and referred to as “Sample Business Plan > Self-assessment > Define business vision.”

You can remove the “>” separator by choosing the “Task name” field in the project synchronization setting.

To create the corresponding issues in Jira, use the “Apply Changes” button as shown in the above figure. The dialog box will inform about the successful creation of the issues with details in the bottom half. The issue keys created in Jira are now associated with the individual tasks of MS Project plan.


As we can see, MS Project’s task “Define business vision” is now associated with issue “SBP-1” in Jira. Similarly, other issues in Jira will be associated with tasks in MS Project after successful creation. This is indicated with a green tick mark.

Note that synchronization here is happening from MS Project to Jira.

We have issues created in Jira, and the project board populates as shown below. 

We see 14 issues created on the Jira side and mapping to the 14 non-summary tasks of the MS Project plan. This is indicated by number 14 in the “TO DO” column above.

Simultaneously, in our MS Project plan, the “Issue Key” field has also populated (see below). The indicator fields in MS Project plan are populated with hyperlinks corresponding with the issues in Jira.

2. Update and Track

Next, let’s take a few tasks in Jira and update them with progress details. As shown below, three issues SBP-1, SBP-2, and SBP-3 from the “TO DO” column have been moved into the “IN PROGRESS” column. 


For individual issues, we have also entered some time logging with the use of the “Log time” field for issues in Jira. 

In our example, the following updates are made.

  • Issue SBP-1 (“Define business vision”): Actual time entered = 8 hours.
  • Issue SBP-2 (“Identify available skills, information and support”): Actual time entered = 6 hours.
  • Issue SBP-3 (“Decide whether to proceed”): Actual time entered = 4 hours.

As we synchronize again, the issues in Jira with tasks in MS Project, we will have the following updates. 

For issue SBP-1, the action now is “Update,” not “Create Issue.” In the bottom-half of the screen, changes have been made only for MS Project. Hence, its fields are populated, with the new value of 8 hours in the “Actual Work” field.

Do note that in this case, the synchronization (update) is happening from Jira to MS Project.

To have the reflection in the MS Project plan, click on the “Apply changes” button as shown above. The changes are then reflected in the MS Project plan, as shown next. 


As you can see, I’ve added three new fields (“% Complete,” “Work,” and “Actual Work”).  The updates from Jira applied to MS Project are:

  • Task ID 3/SBP-1 (“Define business vision”): Actual work of 8 hours 50% complete.
  • Task ID 4/SBP-2 (“Identify available skills, information and support”): Actual work of 6 hours 25% complete.
  • Task ID 5/SBP-3 (“Decide whether to proceed”): Actual work of 6 hours 25% complete.

This perfectly matches with the work logging that we have done for the issues in Jira. The change highlighting feature of MS Project also highlights the fields that have been updated. 

3. Close

To illustrate the “Close” operation, let’s move two issues, SBP-1 and SBP-2, to a “DONE” state from within the Jira project board. Once marked complete, we see fill-up of the time logged details for both these two issues. 


As you use the synchronization from JIRA add-in now and apply changes, the MS Project reflects these results. 


The tasks with ID 3 and ID 4 in MS Project, corresponding to the issues SBP-1 and SBP-2 in Jira project, have been completed or done. This is also reflects in the graphical part of the Gantt Chart view shown on the right side of the above figure.

You can also close the issues in Jira from MS Project itself by using the Ceptah add-in “JIRA Close Issues” command, which is a rarely used historical feature. Note that the Jira project’s workflow scheme is changed to include the status “Resolved.”

--

 *A special note of thanks to Sergey Gussak, the creator of Ceptah Bridge, for his continuous support and for answering my queries. He was very helpful as I prepared this article.


References

[1] Ceptah Bridge Help Documentation by Ceptah Solutions.

[2] MS Project 2016 Live Lessons by Satya Narayan Dash.

[3] Jira Software documentation by Atlassian Corp.


Videos Courses on MS Project Agile and Hybrid-Agile: 

[1] Mastering MS Project Agile (Scrum and Kanban) 

[2] Certified Hybrid-Agile Master Professional

--

This article was first published by MPUG.com on 28th May, 2019.